


Types of Machine Embroidery
List of machine embroidery | Knit of machine embroidery | Machinery embroidery names
Special effects with embroidery can be obtained with yarn combinations, colour changes, special attachments and settings of tension to accomplish different stitching effects
Different Ways of Making Embroidery
Special effects with embroidery can be obtained with yarn combinations, color changes, special attachments and settings of tension to accomplish different stitching effects. In most cases, the embroidery company will specialize in some form of embroidery. Some attachments are part of the machine and others have been developed individually for special purposes and effects.
-
All-overs
![allover-embroidery]() Any continuous pattern which covers the whole width and length of the goods being embroidered from selvage to selvage with a similar design. The design could be any repeat and the figures could be connected or disconnected with or without an alternate mirror. The all-overs can consist of a special start and a special end pattern.
Any continuous pattern which covers the whole width and length of the goods being embroidered from selvage to selvage with a similar design. The design could be any repeat and the figures could be connected or disconnected with or without an alternate mirror. The all-overs can consist of a special start and a special end pattern. -
Trim
![trims-embroidery]() A narrow trimming with scallop one side, raw edge on the other, cut into strips. The end can be joined to finish a four-sided tablecloth.
A narrow trimming with scallop one side, raw edge on the other, cut into strips. The end can be joined to finish a four-sided tablecloth. -
Curtain
![curtain-embroidery]() Mainly used repeats: 12/4 and 24/4. Curtains are generally produced as continuous length embroidery. Some curtains are embroidered with big borer holes on top in order to install the curtain rain.
Mainly used repeats: 12/4 and 24/4. Curtains are generally produced as continuous length embroidery. Some curtains are embroidered with big borer holes on top in order to install the curtain rain. -
Galloon
![galloon-embroidery]() A design with scallops on both sides. The upper part of the design is usually mirrored and repeated once. Normally the fabric is cut on both the sides of the embroidery. Uses blouses and lingerie.
A design with scallops on both sides. The upper part of the design is usually mirrored and repeated once. Normally the fabric is cut on both the sides of the embroidery. Uses blouses and lingerie. -
Insert
![insert-embroidery]() A design where both sides have straight edges; usually sewn into a garment. Uses blouses, dresses.
A design where both sides have straight edges; usually sewn into a garment. Uses blouses, dresses. -
Table Cloth
![table-cloth-embroidery]() The simplest way of embroidering a tablecloth is to repeat a motive. Space between two tablecloths can be achieved by eliminating needles. After completing the first line of motives all the needles which are not used for the second line are deactivated. Consider how you will treat the corners. To do special corners, four special punching is required. On standard machines, the non-working needles have to be eliminated manually.
The simplest way of embroidering a tablecloth is to repeat a motive. Space between two tablecloths can be achieved by eliminating needles. After completing the first line of motives all the needles which are not used for the second line are deactivated. Consider how you will treat the corners. To do special corners, four special punching is required. On standard machines, the non-working needles have to be eliminated manually.On ATC machines non-working needles are eliminated automatically when setting different repeats in the punching. Of course, to do this kind of embroidery on a standard machine is time-consuming. After eliminating needles the yarn and the shuttles have to be removed from the threading roller. On an ATC machine repeat is determined during the punching process.
-
Collar
![collar-embroidery]() Collars can be stitched on ordinary fabric or as chemical lace, with boring effects or without or with the application, multi-colored or single-colored. Often collars are embroidered in 12/4.
Collars can be stitched on ordinary fabric or as chemical lace, with boring effects or without or with the application, multi-colored or single-colored. Often collars are embroidered in 12/4. -
Rubber Bobbin
![rubber-embroidery]() The design will consist mostly of running stitches. The combination of both rubber bobbins and elastic fabrics will crinkle an all-overs pattern when the tension of the fabric is removed.
The design will consist mostly of running stitches. The combination of both rubber bobbins and elastic fabrics will crinkle an all-overs pattern when the tension of the fabric is removed. -
Quilting
![quilting-embroidery]() A fabric construction in which a layer of down or fiberfill is placed between two layers of fabric, and then held in place by stitching or sealing in a regular, consistent all-overs pattern on the goods.
A fabric construction in which a layer of down or fiberfill is placed between two layers of fabric, and then held in place by stitching or sealing in a regular, consistent all-overs pattern on the goods.Quilting can be stitched on a Schiffli machine by spanning the face fabric with a second fabric and filler which can be cotton wadding or foam type goods. The three fabrics have to be sewed together, with the front fabric overlapping the others of about 2 cm on each side. The needles stitch through the three pieces and the tension of the stitching pulls the goods together, causing it to puff or quilt the design.
Mostly, quilting effects are done with running stitches. This type of work is labor intensive and prices are based more on labor than on stitches. Limitations on the number of goods that can be spanned at one time also can add much downtime for spanning.
-
Ribbon Inserts
As the stitching process takes palace, a ribbon can be stitched into the design as follows: a chemical lace fabric is spanned on the machine. A design is punched with a stop at a predetermined point. The ribbon is placed on the whole length of the machine and fixed at the very left and right end of the ribbon.
The front yarns hold the lower edge of the ribbon. The stitching process continuous by fixing the ribbon. The embroidery can be made over the whole ribbon or not the top and on the bottom edge of the ribbon. The difficulty in embroidering ribbons is to exactly position the embroidery on the ribbon. Uses Lingerie.
-
Borer hole (eyelet lace) designs
![borer-hole-embroidery]() Borings holes can be made in various shapes: triangles, squares, circles etc. To complete the effect, stitches are put on the outside of the borer hole.
Borings holes can be made in various shapes: triangles, squares, circles etc. To complete the effect, stitches are put on the outside of the borer hole. -
Repeat and Colour change (ATC) designs
![multi-color-embroidery]() Using two or more colors to enhance a design like a flower or a leaf. There is no limit to color that can be used if the costs can be absorbed.
Using two or more colors to enhance a design like a flower or a leaf. There is no limit to color that can be used if the costs can be absorbed.Colour change patterns are made on ATC/Pentamat machines. These machines have one separate thread roller for each needle which is only active if the needle is only. Of course, color change designs can be made on a standard machine too, but to add or to remove needles and yarns and to do another repeat is very time-consuming.
Usually, colour changes are used for repeats of 8/4 or larger, allowing two colors or more. 12/4 allows three different colors to be present, 16/4 colors etc. All thread colors and the corresponding shuttles are set right from the start.
The repeat and color changes are present in punching. If the work is very delicate every design with all its colors is finished before starting the next design. For example, colour No. 1 will be used to embroider the stem and the leaves. Then a jump stitch will be carried out in an upward movement. To lock the yarn two stitches will be made, then the repeat is changed automatically and the second color starts working etc.
If the design is big, some colors are used twice or thrice to complete the pattern. It is not so difficult to run color change designs on the machine; the complicated part is the punching of it.
A way to say time, if the design allows it is to complete all the figures which should have the same color, on the full frame. After cutting off the first color, change the repeat, use color two and check whether the second color is positioned properly.
-
Superfix (Alternating)
Until the advent of automatic color change, each color had to be changed by hand. One way to overcome this problem was to alternate colors on the machine i.e. if you stitch a two-color design, you can combine two colors in each figure without the tedious work of changing colors. The yarns are threaded in an alternating order.
Alternating can be done with more than two colors but every additional color makes punching more complicated. To change the repeat, jump stitches can be used or according to the design, repeat changes can be done by punching through the design.
The difficulty in punching superfix designs is to make the change from one repeat to another invisible. A superfix design with two colors will always result in an unfinished an unusable repeat at the beginning and at the end of the fabric (in a three-color design two repeats on each side are not usable).
Thus each needle stitches simultaneously for example the first needle stitches black and the second needle red, the third black, the fourth red etc. In order to embroider a flower with two different colors, the leaves have to be done first and by moving the frame one repeat we have adjoining color in the next repeat to do the center of the flower with the second color.
-
Embroidery with Ombre Yarn
The use of Ombre yarn is another possibility to produce colorful embroidery on a standard machine. Ombres are single yarn dyed with several different colors. The length of each color on the yarn is about the same, for example, 12” or so. There is a slight variance of the length of each color on the yarn so the repetition of the colors forms a varying pattern on the finished item. Ombre designs can be easily identified because color changes appear in the middle of an effect. The color changes look different on every repeat.
-
Appliqué Embroidery
The addition of a second fabric during the embroidery process is called appliqué embroidery. The application fabric is attached to the base fabric from the beginning but is rolled up and fixed on the upper roller while the base fabric is embroidered. Then front yarn is cut, application fabric is spanned and the rest of the design is embroidered. The following stitches fix the application fabric on the base fabric. After the fabric is off-spanned it is hand cut as close as possible, but unless laser cuts it will never be entirely clean.
-
Loose Hanging Figures
Results of this embroidery are motifs (flowers, leaves) which are only fixed partially. The rest of the motifs are hanging loose on the fabric and add a third dimension to the fabric. All the parts which should be loose have to be embroidered first on a chemical fabric. After cutting off the shuttle yarn and attaching the second fabric at the back, the previous snitched motifs get fixed on the second fabric by making other stitches on top. Keep on checking that the stitches on the second fabric fit properly because of the possibility of fabric shifts. After the fabric is unspanned, the chemical fabric will be removed.
-
Continuous Length Embroidery
Generally, curtains are embroidered as continuous length goods. This means that the fabric is shifted lengthwise without cutting. It is very important that there is a smooth changeover from one embroidery area to the next without having haps in the design. For continuous length embroidery, special side tension bars have to be used.
-
Painting
The design is stitched with special areas outlined. A mask or stencil is placed over the designated areas while the fabric is still spanned, and then a color is added. The same can be accomplished after the fabric is unspanned and spread on a work table.
-
Two-sided Embroidery
Used specifically for macramé curtains. The purpose is to make the embroidery look alike on each side of the curtain. In normal stitching more front yarn than bobbin yarn is used, in macramé goods amount of used front and bobbin yarn is equal.
The setting of the tension should be equal on both sides; the joining point of the shuttle and front thread should meet at the fabric line.
-
Lace (Guipure)
![lace-embroidery]() The basic idea is to run a design on a fabric, which will be removed after the fabric is unspanned so that nothing but stitches is left. Removing the fabric can be made with a dry (Macramé, Guipure) or wet process, the resultant lace must be constructed in a way that the stitching remains in one piece. Shrinkage is to be expected with the wet process and must be anticipated in the design. The punching of chemical designs is very difficult. Empty spaces in chemical lace designs are not the work of borers.
The basic idea is to run a design on a fabric, which will be removed after the fabric is unspanned so that nothing but stitches is left. Removing the fabric can be made with a dry (Macramé, Guipure) or wet process, the resultant lace must be constructed in a way that the stitching remains in one piece. Shrinkage is to be expected with the wet process and must be anticipated in the design. The punching of chemical designs is very difficult. Empty spaces in chemical lace designs are not the work of borers. -
Sequin Embroidery
![sequin-embroidery]() Sequins or paillettes are small; shiny ornaments respectively metal disks, used in decorating women’s dresses. They are available in various shapes and sizes, often round shaped sequins with a 7mm diameter are used. They possess a hole in the center by which they are attached to the fabric.
Sequins or paillettes are small; shiny ornaments respectively metal disks, used in decorating women’s dresses. They are available in various shapes and sizes, often round shaped sequins with a 7mm diameter are used. They possess a hole in the center by which they are attached to the fabric. -
Hand Cut Embroidery
Contrary to holes in borer designs, the holes in hand-cut embroideries are not produced from borers during the embroidery process. The holes are made by burning the fabric with a glowing wire after removing the fabric from the machine. This method is recommended for large holes that cannot be achieved by using the borers on the machine or for thin fabrics. The larger the hole the more fabric has to be pulled to the edge of the hole the more irregular will be the result. Used with synthetic fabrics, often used for curtains and African designs.
-
Cord
The cord is threaded as usual. Cord threads are rigid or stiff and thus cannot be pulled to the back side of the fabric. This why the cord thread lies on the front side of the fabric pulling the shuttle threads to the front as well. Cords are often used for lingerie and guipure designs. Cords are always embroidered as running stitches because stitch types do not run well with the stiff cords.
Consider the following when embroidering the cords:
- If shuttles are regulated to lose, the closer thread will be visible on the front side in curves which worsens the overall appearance of the design
- The tension has to be tightening on the front when embroidering cords, adjust tension considering the type of fabric and the characteristics of the cord used.
- Choose needle size and type according to the texture of the cord used. Otherwise cord may bread.
 Any continuous pattern which covers the whole width and length of the goods being embroidered from selvage to selvage with a similar design. The design could be any repeat and the figures could be connected or disconnected with or without an alternate mirror. The all-overs can consist of a special start and a special end pattern.
 A narrow trimming with scallop one side, raw edge on the other, cut into strips. The end can be joined to finish a four-sided tablecloth.
 Mainly used repeats: 12/4 and 24/4. Curtains are generally produced as continuous length embroidery. Some curtains are embroidered with big borer holes on top in order to install the curtain rain.
 A design with scallops on both sides. The upper part of the design is usually mirrored and repeated once. Normally the fabric is cut on both the sides of the embroidery. Uses blouses and lingerie.
 A design where both sides have straight edges; usually sewn into a garment. Uses blouses, dresses.
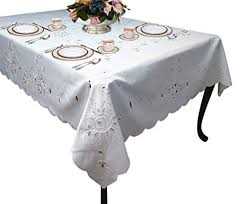 The simplest way of embroidering a tablecloth is to repeat a motive. Space between two tablecloths can be achieved by eliminating needles. After completing the first line of motives all the needles which are not used for the second line are deactivated. Consider how you will treat the corners. To do special corners, four special punching is required. On standard machines, the non-working needles have to be eliminated manually.
 Collars can be stitched on ordinary fabric or as chemical lace, with boring effects or without or with the application, multi-colored or single-colored. Often collars are embroidered in 12/4.
 The design will consist mostly of running stitches. The combination of both rubber bobbins and elastic fabrics will crinkle an all-overs pattern when the tension of the fabric is removed.
 A fabric construction in which a layer of down or fiberfill is placed between two layers of fabric, and then held in place by stitching or sealing in a regular, consistent all-overs pattern on the goods.
 Borings holes can be made in various shapes: triangles, squares, circles etc. To complete the effect, stitches are put on the outside of the borer hole.
 Using two or more colors to enhance a design like a flower or a leaf. There is no limit to color that can be used if the costs can be absorbed.
 The basic idea is to run a design on a fabric, which will be removed after the fabric is unspanned so that nothing but stitches is left. Removing the fabric can be made with a dry (Macramé, Guipure) or wet process, the resultant lace must be constructed in a way that the stitching remains in one piece. Shrinkage is to be expected with the wet process and must be anticipated in the design. The punching of chemical designs is very difficult. Empty spaces in chemical lace designs are not the work of borers.
 Sequins or paillettes are small; shiny ornaments respectively metal disks, used in decorating women’s dresses. They are available in various shapes and sizes, often round shaped sequins with a 7mm diameter are used. They possess a hole in the center by which they are attached to the fabric.