


All About Industrial Stitching and Sewing Machine
Types of stitching or sewing machines, stitch machine components such as needles, feed systems, sewing machine motors, type of stitches, stitching defects, and safety measures
Industrial sewing machines are specialized machines that are designed to perform specialized tasks in high volumes. Various industrial sewing machines and their components and features are explained in this article.
Sewing Machines

Stitching is the process of producing garments by joining various components of fabric, either woven or knitted using a stitching machine or sewing machine. A sewing machine is a machine used to stitch fabric and other materials together with thread. Sewing machines were invented during the first Industrial Revolution to decrease the amount of manual sewing work performed in clothing companies.
The first possible patent connected to mechanical sewing was a 1755 British patent issued to German, Charles Weisenthal. Weisenthal was issued a patent for a needle that was designed for a machine. However, the patent did not describe the rest of the machine.
The first functional sewing machine was invented by the French tailor, Barthelemy Thimonnier, in 1830. Thimonnier’s machine used only one thread and a hooked needle that made the same chain stitch used with embroidery. The inventor was almost killed by an enraged group of French tailors who burned down his garment factory because they feared unemployment as a result of his sewing machine invention.
In 1854 Howe took Singer to court for patent infringement and Howe won the case. This was a shock for all inventors of sewing machines and caused what became known as a ‘Sewing Machine War.’ Lawyers saw the different patents exposed and termed this situation as a ‘patent thicket.’
Although Isaac Merritt Singer did not invent the sewing machine he manufactured sewing machines. His brand of machines, the Singer, was the world’s most popular brand by 1860. In the early 1900s, the machine was beginning to be modernized with electricity and the hand machine was getting replaced with a foot pedal.
Commercial, industrial sewing machines are highly specialized machines that are designed to perform a smaller range of tasks as opposed to your common household models that serve a wider variety of tasks. The upside of these machines is that they are built to perform jobs that may be too tough for other machines.
List of Industrial Sewing Machines
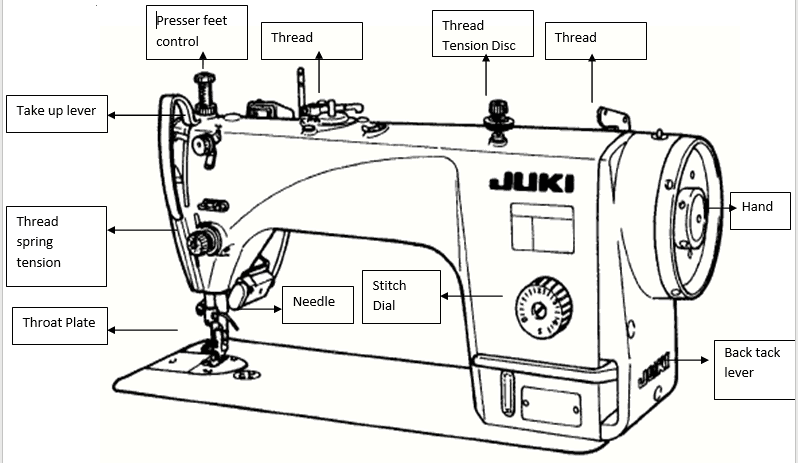
Single Needle Lock Stitch Machine (SNLS)
The Single Needle Lock Stitch Machine is the most popular and versatile sewing machine in the industry. It is designed to produce consistent results in sample and production rooms. The Lockstitch forms precise and secured straight stitches on the top and the underside of the fabric as the needle thread and the bobbin thread lock (each other each time the needle passes through the fabric).
Did you know that September is actually celebrated as National Sewing Machine month? President Ronald Regan declared the September National Sewing Machine month in 1982 to honor the sewing machine.

Technical training for SNLS machine
Technical adjustments which are to be taught while dealing with SNLS machines are given below. Trainers should keep the following points in mind during the session of the SNLS machine.
- First, demonstrate the adjustment then ask the trainee to practice on the machine
- Use the Instructional manual given by the machinery supplier during Session
- Make sure, all the trainees are able to understand the Instructional manual.
Technical adjustments of SNLS machine
- Basic Machine Practice (Loop Exercise)
- Technical Specification
- Installation of needle
- Needle bar height adjustment
- Hook Set Timing
- Feed Dog adjustment and alignment
- Feed Dog Eccentric cam Adjustment
- Pressure foot to the Pressure adjustment
Double-Needle Lock Stich Machine (DNLS)
A Double Needle Lock Stitch Machine (DNLS) works on the same principle as a Single Needle Lock Stitch Machine (SNLS) by using two needles and two bobbins thus resulting in two parallel rows of lockstitch. This technique of twin needle sewing is also popularly known as double-needle sewing. the distance between the two stitch lines depends upon the distance between the two needles on the needle bar which can be adjusted. Applications include sewing box pockets in jackets, light jeans, pajamas, and many more.
Technical training for DNLS Machine
Technical adjustments which are to be taught while dealing with DNLS machines are given below. Trainers should keep the following points in mind during the session of DNLS machine
- First, demonstrate the adjustment then ask the trainee to practice on the machine
- Use the Instructional manual given by the machinery supplier during Session
- Make sure, all the trainees are able to understand the Instructional manual
Technical adjustments of DNLS machine
- Basic Machine Practice (Loop Exercise)
- Technical Specification
- Installation of needle
- Needle bar height adjustment
- Hook Set Timing
- Feed timing Cam adjustment
- Sprocket belt adjustment and change
- Feed Dog adjustment and
- Feed Dog alignment
- Thread adjustment
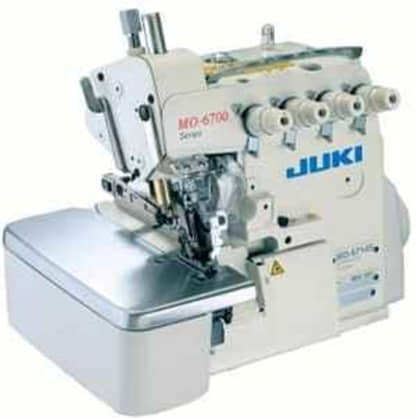
Overlock Machine
An overlock / over edge machine is a high-speed sewing machine. This is the quickest performing machine for giving over edge stitches. Overlock Machines Are available in the following Specifications
- 2 T Overlock machine
- 3 T Overlock Machine
- 4 T Overlock Machine
- 5 T Overlock Machine
- 6 T Overlock Machine
| Sr.No. | Machine Name | No. Of Threads | |
|---|---|---|---|
| 1 | 2 T Overlock Machine | 1 | 1 |
| 2 | 3 T Overlock Machine | 1 | 2 |
| 3 | 4 T Overlock Machine | 2 | 2 |
| 4 | 5 T Overlock Machine | 2 | 3 |
| 5 | 6 T Overlock Machine | 3 | 3 |
Technical Training of Overlock Machine
Technical adjustments which are to be taught while dealing with OVERLOCK machines are given below. Trainers should keep the following points in mind during the session of the OVERLOCK machine
- First, demonstrate the adjustment then ask the trainee to practice on the machine
- Use the Instructional manual given by the machinery supplier during Session
- Make sure, all the trainees are able to understand the Instructional manual
- The practice of sewing on the machine is also necessary
Technical adjustments of OVERLOCK machine
- Basic Machine Practice
- Technical Specification
- Installation of needle
- Needle bar height adjustment
- Needle to lower looper timing
- Upper Looper Timing
- Chain looper timing (Safety Stitch)
- Upper Knife Adjustment
- Lower Knife adjustment
- Feed Dog height adjustment
- Cam Timing
- Thread Adjustment
Flat Lock Machine
Flatlock machines are specialized, high-speed machines. These machines are extremely fast and efficient. In this machine, the stitch is formed by two or more needle threads passing through the material, inter looping on the underside, and interlocking on the upper side. These machines are mainly used for knits.
Parts of Flat-Lock Machine
Technical training of Flatlock Machine
Technical adjustments which are to be taught while dealing with FLATLOCK machines are given below. Trainers should keep the following points in mind during the session of the FLATLOCK machine.
- First, demonstrate the adjustment then ask the trainee to practice on the machine
- Use the Instructional manual given by the machinery supplier during Session
- Make sure, all the trainees are able to understand the Instructional manual
- The practice of sewing on the machine is also necessary
Technical adjustments of Flatlock machine
- Basic Machine Practice
- Technical Specification
- Installation of needle
- Needle bar height adjustment
- Main looper timing
- Spreader Looper Adjustment
- Stitch Length Adjustment
- Feed Dog height adjustment
- Cam Timing (Thread)
- Needle and looper guard adjustment
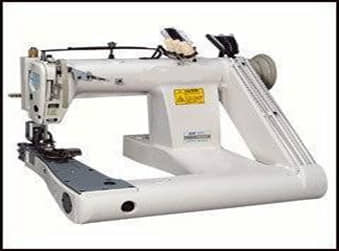
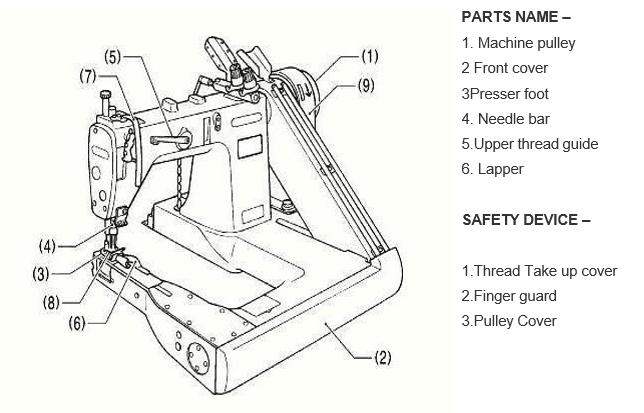
The Feed of the Arm Machine
This machine is largely used for attaching sleeves and for making complex circular stitches while attaching different parts of the garment
Technical training of Feed of the Arm Machine
Technical adjustments which are to be taught while dealing with Feed of Arm machines are given below. Trainers should keep the following points in mind during the session of Feed of arm machine
- First, demonstrate the adjustment then ask the trainee to practice on the machine
- Use the Instructional manual given by the machinery supplier during Session
- Make sure, all the trainees are able to understand the Instructional manual
- The practice of sewing on the machine is also necessary
Technical adjustments of Feed of arm machine
- Basic Machine Practice
- Technical Specification
- Installation of needle
- Needle bar height adjustment
- Main looper timing
- Puller adjustment
- Needle Guard Adjustment
- Looper Guard adjustment
- Feed Dog height adjustment
- Stitch Length Adjustment (Threading adjustment)
Button Hole Machine
This machine is used for sewing buttons in the garment.

Technical training of Button Hole Machine
Technical adjustments which are to be taught while dealing with Button Hole machines are given below. Trainers should keep the following points in mind during the session of the Button Hole machine
- First, demonstrate the adjustment then ask the trainee to practice on the machine
- Use the Instructional manual given by the machinery supplier during Session
- Make sure, all the trainees are able to understand the Instructional manual
- The practice of sewing on the machine is also necessary
Technical adjustments of Button Hole machine
- Basic Machine Practice
- Technical Specification
- Installation of needle
- Needle Bar height adjustment
- Hook Set Timing clearance
- Thread trimming or scissors timing adjustment
- Knife Adjustment and change
- Panel Programming
Blind-Hem Machine
Blind hem stitches are completely hidden on the front of the garment and almost completely hidden on the inside of the garment. The sewer catches only a few threads of the fabric each time the needle is pulled through the fabric, which means that the majority of the stitching is hidden inside the hem.

Technical training of Blind Hem Machine
Technical adjustments which are to be taught while dealing with Blind Hem machines are given below. Trainers should keep the following points in mind during the session of the Blind Hem machine.
- First Demonstrate the adjustment then ask the trainee to practice on the machine
- Use the Instructional manual given by the machinery supplier during Session
- Make sure, all the trainees are able to understand the Instructional manual
- The practice of sewing on the machine is also necessary
Technical adjustments of Blind Hem machine
- Basic Machine Practice
- Technical Specifications
- Looper timing adjustment
- Stitch Length Adjustment
Button Attach Machine
This is a high-speed buttonholing machine, which is used for sewing buttonholes in the garment.

Technical training of Button Attach Machine
Technical adjustments which are to be taught while dealing with Button Stitch machines are given below. Trainers should keep the following points in mind during the session of the Button Stitch machine.
- First, demonstrate the adjustment then ask the trainee to practice on the
- Use the Instructional manual given by the machinery supplier during Session
- Make sure, all the trainees are able to understand the Instructional
- The practice of sewing on a machine is also
Technical adjustments of Button Attach machine
- Basic Machine Practice
- Technical Specification
- Installation of needle
- Button center adjustment
- Work Clamp adjustment
- Needle Bar height adjustment
- Hook Set Timing
- Thread trimming (By moving and fixing knife) Adjustment
- Panel Programming

Name of the various parts
- Power Switch
- Control box
- SD card Slot
- Operation Panel
- Foot Switch
- Work Clamp
- Button Clamp
- Pulley
- Cotton Stand
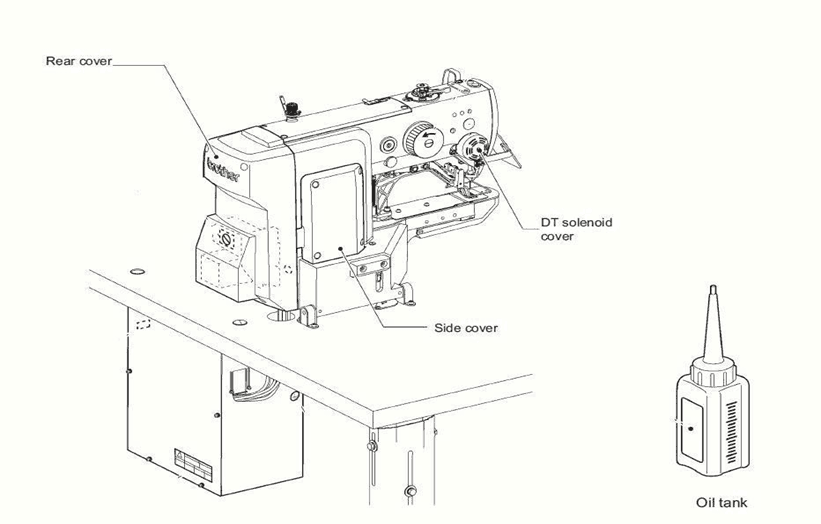
Safety devices
- Finger Guard
- Eye Guard
- Threads take Up Cover
- Rear Cover
- Side Cover
- DT Solenoid Cover
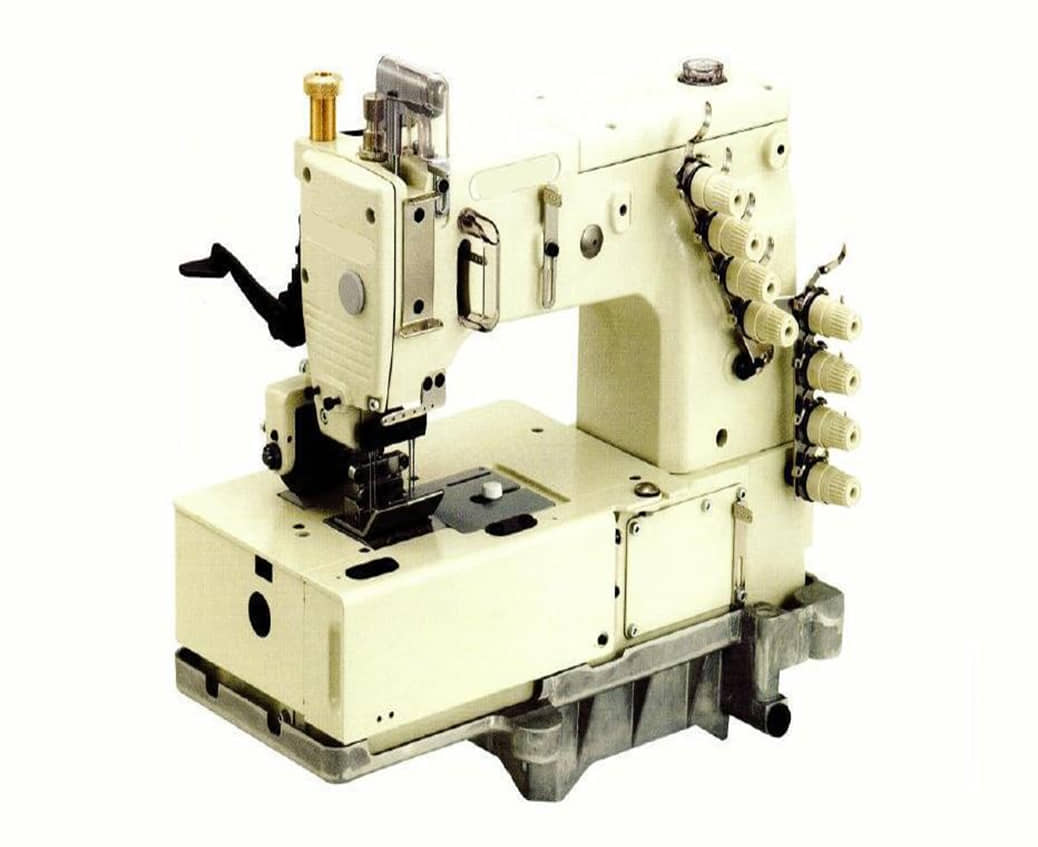
Bartack Machine
Bartacking is a type of reinforcement stitching that is done using a Bartack machine. This technique is used by the fabric and textile industries to fortify stress points in clothing, sporting equipment, uniforms, and a host of other products.

Technical training of Bartack Machine
Technical adjustments which are to be taught while dealing with Bartack machines are given below. Trainers should keep the following points in mind during the session on the Bartack machine.
- First, demonstrate the adjustment then ask the trainee to practice on the machine
- Use the Instructional manual given by the machinery supplier during Session
- Make sure, all the trainees are able to understand the Instructional manual
- The practice of sewing on the machine is also necessary

Technical adjustments of Bartack machine
- Basic Machine Practice
- Technical Specification
- Installation of needle
- Needle Bar height adjustment
- Stitch length adjustment
- Hook Set Timing
- Thread trimming (By moving and fixing knife) Adjustment
- Panel Programming
You have said it all what I marveled about is the blind hem stitchine industrial machine in the Collage I went Vogue Style as twenty ten graduate
school of fashion and designing by Joyce Aba Bio was thought by hand Heming and Blind stitches was one mean the hand stitching thanks a lot guys.