

The core hand stitches are running stitch, basting (tacking), backstitch, prick stitch, slip stitch, whipstitch, overcast stitch, blind hem stitch, catch stitch, hemming stitch, blanket stitch and buttonhole stitch. Running stitch and backstitch join fabric, basting holds it in place until the real seam is sewn, slip, blind hem, catch and hemming stitches hold hems, overcast and blanket stitch finish raw edges, whipstitch joins two edges, and buttonhole stitch protects a cut edge. Sewing machines make a different family of stitches. The international standard ISO 4915 numbers them in six classes, from 100 (chainstitch) to 600 (covering stitch), and the 301 lockstitch is the most common of them all. This page gives a one-line use for every hand stitch, then each one in turn with numbered steps and its common faults, then the machine classes with the thread each one consumes, seam types, and the site’s calculators for stitches and thread.
Last verified: 5 October 2026. Sources are linked where they are used and listed at the end. Directions are written for a right-handed sewer; left-handed sewers work the same stitches in the opposite direction.
Hand stitches at a glance
- Running stitch: simple seams under little strain, gathering, easing and quilting.
- Basting (tacking) stitch: long temporary stitches that hold layers together until the permanent seam is sewn.
- Backstitch: the strongest hand seam, and the usual way to repair a split machine seam.
- Prick stitch: a backstitch that shows only tiny dots on the face, for hand-set zips and fine topstitching.
- Slip stitch and ladder stitch: near-invisible stitching along a fold, for hems, linings and closing a turning gap.
- Whipstitch: slanting stitches over two edges, for joining felt, patchwork pieces and appliqué.
- Overcast stitch: slanting stitches over one raw edge to stop it fraying.
- Blind hem stitch: a hem stitch worked inside the fold, almost invisible from either side.
- Catch stitch (herringbone): a crossed stitch with built-in give, for hems in knits and for holding facings and interfacing.
- Hemming (slant hem) stitch: the quickest hand hem, also used to finish bindings and fell linings.
- Blanket stitch: a looped stitch that finishes and decorates edges of blankets, felt and appliqué.
- Buttonhole stitch: close stitches with a knot on the edge, for hand-worked buttonholes, eyelets and cutwork.
Decorative hand stitches such as chain, stem, satin, cross stitch and French knots belong to embroidery and are summarised in embroidery stitches in brief. Machine stitches are covered in the six machine stitch classes.
Temporary, permanent and decorative stitches
School and vocational syllabuses group hand stitches by how long they are meant to stay in the cloth. India’s National Institute of Open Schooling, in its Basic Stitching Skills course (461), teaches three groups. Temporary stitches hold the work until it is sewn and are then removed. Permanent stitches stay in the finished article and carry its seams and hems. Decorative stitches are there to be seen.
| Group | What the stitches do | Stitches in the group |
|---|---|---|
| Temporary | Hold layers or mark pattern points, then come out | Even, uneven and diagonal basting (tacking); thread marking and tailor’s tacks; running stitch when it is only holding |
| Permanent | Join, hem and finish, and stay in the article | Running stitch in a seam, backstitch, prick stitch, slip stitch, whipstitch, overcasting, blind hem, catch stitch, hemming |
| Decorative | Embellish the surface or an edge | Stem, chain, lazy daisy, blanket, herringbone, fishbone, buttonhole, satin, French knot, bullion, cross stitch, feather, smocking |
Some stitches sit in two groups. NIOS lists running stitch among the temporary stitches, yet it is permanent when it forms a gathered or quilted seam. Blanket, herringbone and buttonhole stitches are decorative in embroidery and functional on an edge or a buttonhole.
The hand stitches, one by one
Every stitch below starts the same way: a needle suited to the fabric, a single strand of thread knotted at the end, and the knot hidden on the wrong side or inside a fold. The sewing needles guide covers needle types, the sewing thread guide covers thread, and the needle and thread matcher pairs a thread ticket number with a needle size. The stitch lengths quoted are the ones given in the Singer Reference Library, which the Sewing & Craft Alliance republishes on its hand stitching page; finer fabric takes smaller stitches.
Running stitch
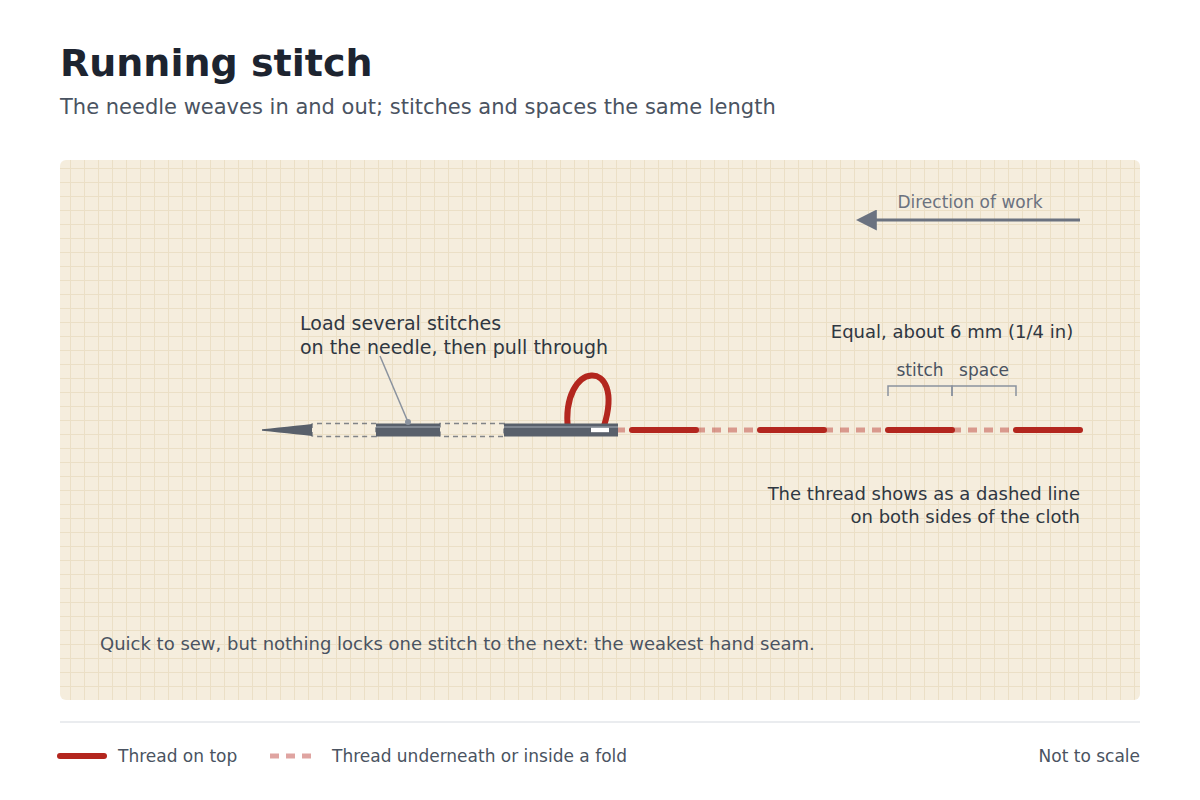
The needle passes in and out of the fabric at even intervals, so the thread shows as a dashed line on both sides. It is the quickest hand stitch and the weakest seam, because nothing locks one stitch to the next. Use it for seams that take little strain, for gathering and easing a longer edge onto a shorter one, and for hand quilting. Japanese sashiko and Bengali kantha are both built on running stitch.
- Bring the needle up from the wrong side at the start of the line.
- Weave the needle point in and out along the line, loading several stitches onto the needle before pulling it through.
- Keep the stitches and the spaces the same length. Singer gives short, even stitches of about 6 mm (1/4 in) for close control.
- Draw the thread through smoothly, without pulling the fabric up, unless the aim is to gather it.
- Secure the end with a backstitch on the wrong side.
Common faults. Uneven stitch lengths, which show at once on the face. Thread pulled too tight, which puckers the seam. Stitches too long for the load, which gape when the seam is stressed. For gathers, a single row tends to twist; two parallel rows pulled up together give even gathers.
Basting (tacking) stitch
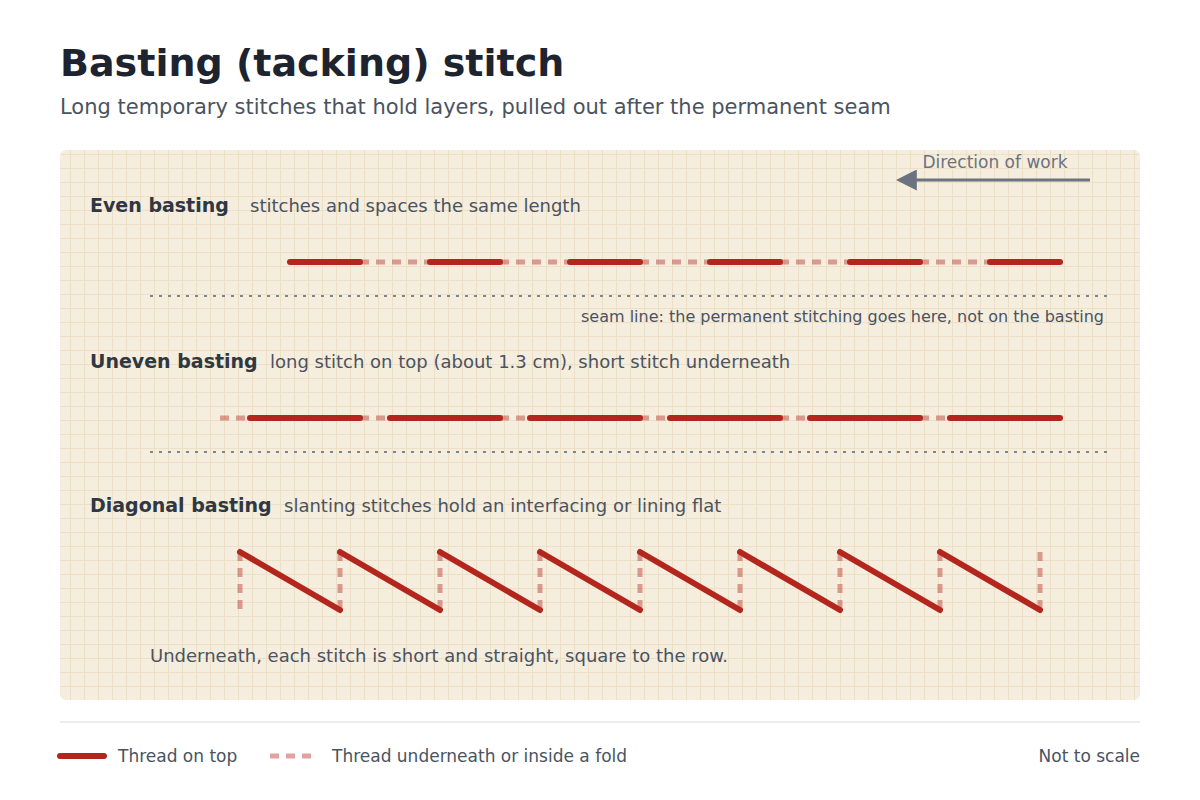
Basting is a long running stitch that holds pieces together for fitting or for sewing, and is pulled out once the permanent seam is in. Even basting has stitches and spaces of the same length. Uneven basting combines a long stitch with a short one; Singer gives the long stitch as 1.3 cm (1/2 in), and recommends it for straight or slightly curved seams. Diagonal basting, rows of slanting stitches, holds layers such as an interfacing or a lining flat over an area. Thread marks and tailor’s tacks, loose stitches that transfer pattern markings to the cloth, belong to the same temporary family.
- Thread the needle with a smooth thread in a colour that contrasts with the fabric, so it is easy to find and remove.
- Pin the layers, then sew along the seam allowance just beside the line the permanent seam will follow, not on it.
- Make the stitches long and even, or alternate long and short stitches for uneven basting.
- Finish with one loose backstitch, not a knot, so the thread pulls out easily.
- After the permanent seam is sewn, clip the basting every few stitches and pull the pieces out.
Common faults. Basting sewn on the seam line, where the machine stitches trap it. Basting pulled taut, which puckers the layers it is meant to hold flat. Dark basting thread left in pale fabric, or pressed over, which can leave marks.
Backstitch
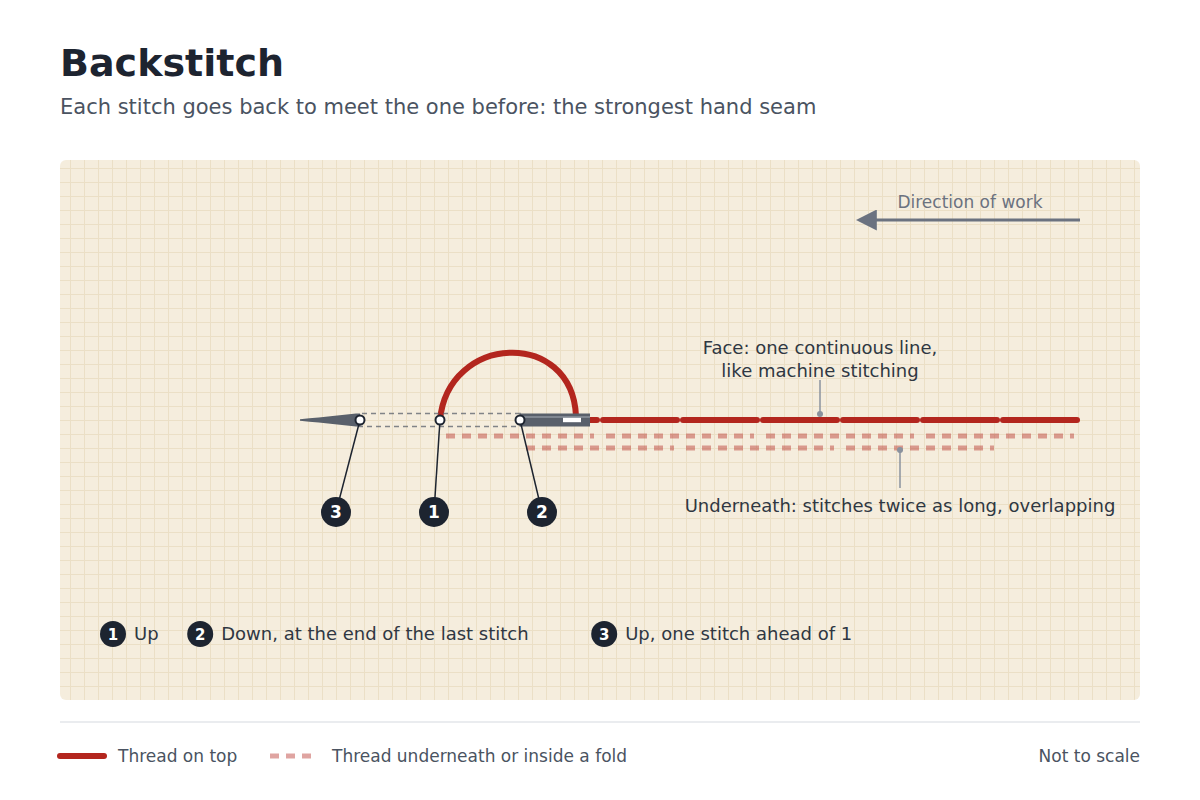
Each stitch goes back to meet the end of the one before, so the face shows a continuous line that looks like machine stitching and the underside shows longer, overlapping stitches. That overlap makes backstitch the strongest hand seam. Use it to repair a seam that has split, to sew seams in places a machine cannot reach, and, in embroidery, to outline.
- Bring the needle and thread up through the fabric to the upper side.
- Insert the needle 1.5 to 3 mm (1/16 to 1/8 in) behind the point where the thread came out.
- Bring it out the same distance in front of that point.
- Insert the needle again into the end of the previous stitch, and bring it out one stitch ahead. Repeat to the end of the seam.
- Check the underside: Singer notes that its stitches are twice as long as those on the upper side.
Common faults. Gaps between stitches, from not returning to the same hole. Overlapping stitches on the face, from returning too far. Thread pulled tight, which puckers fine fabric.
Prick stitch
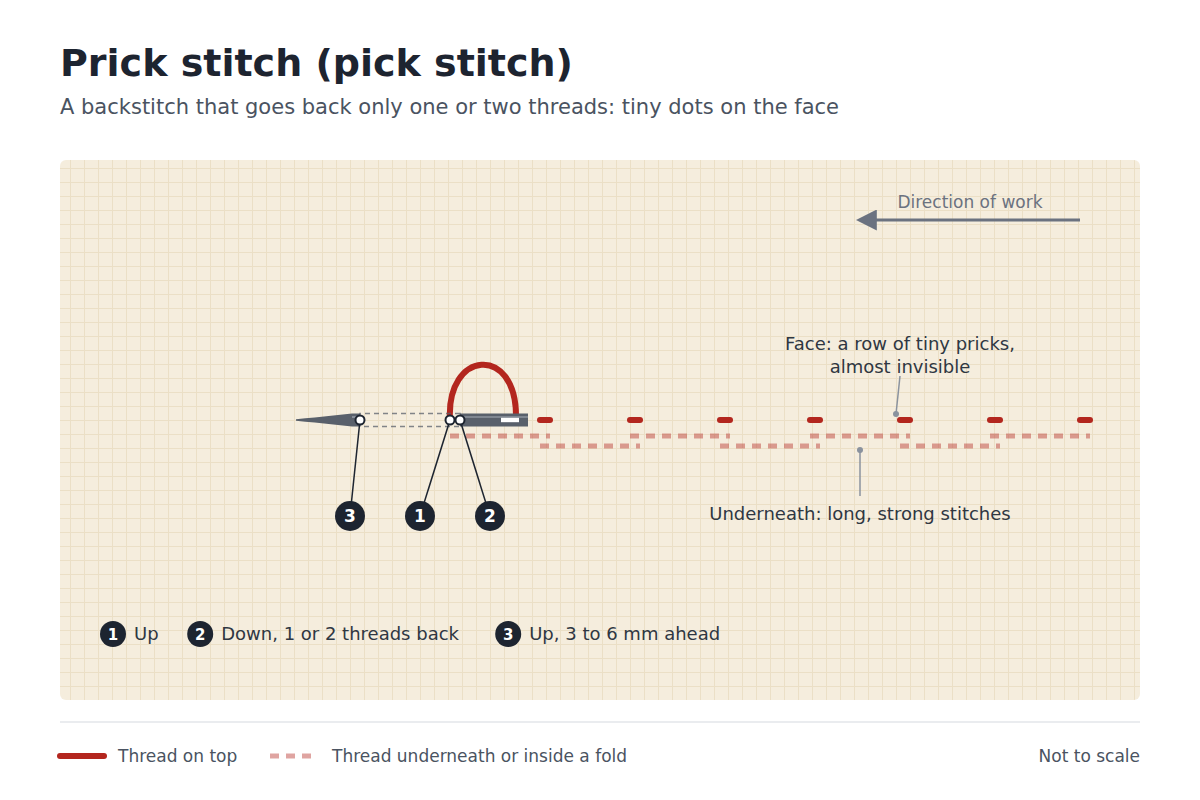
Prick stitch, also called pick stitch, is a backstitch that goes back only one or two threads of the fabric, so the face shows a row of tiny dots while the underside carries long, strong stitches. Use it where a seam must be strong but almost invisible: setting a zip by hand, understitching a facing, or topstitching a tailored edge.
- Bring the needle and thread up through the fabric to the upper side.
- Insert the needle only one or two fabric threads behind the point where the thread came out.
- Bring the needle up 3 to 6 mm (1/8 to 1/4 in) in front of that point.
- Repeat, keeping each surface stitch a very small “prick” and the spacing even.
Common faults. Surface stitches that grow into a backstitch, which defeats the purpose. Uneven spacing, which shows more than uneven length. Tension too tight, which dimples the fabric at each prick.
Slip stitch and ladder stitch
In a slip stitch the thread travels inside a folded edge and catches only one or two threads of the fabric opposite, so almost nothing shows on either side. Use it for hems on a folded edge, to attach linings and pockets, and to sew appliqué with a turned edge. Ladder stitch is the same stitch worked between two folded edges, alternating from one fold to the other; pulling the thread draws the folds together and the “rungs” disappear, which is how a stuffed toy or a cushion is closed after turning it right side out.
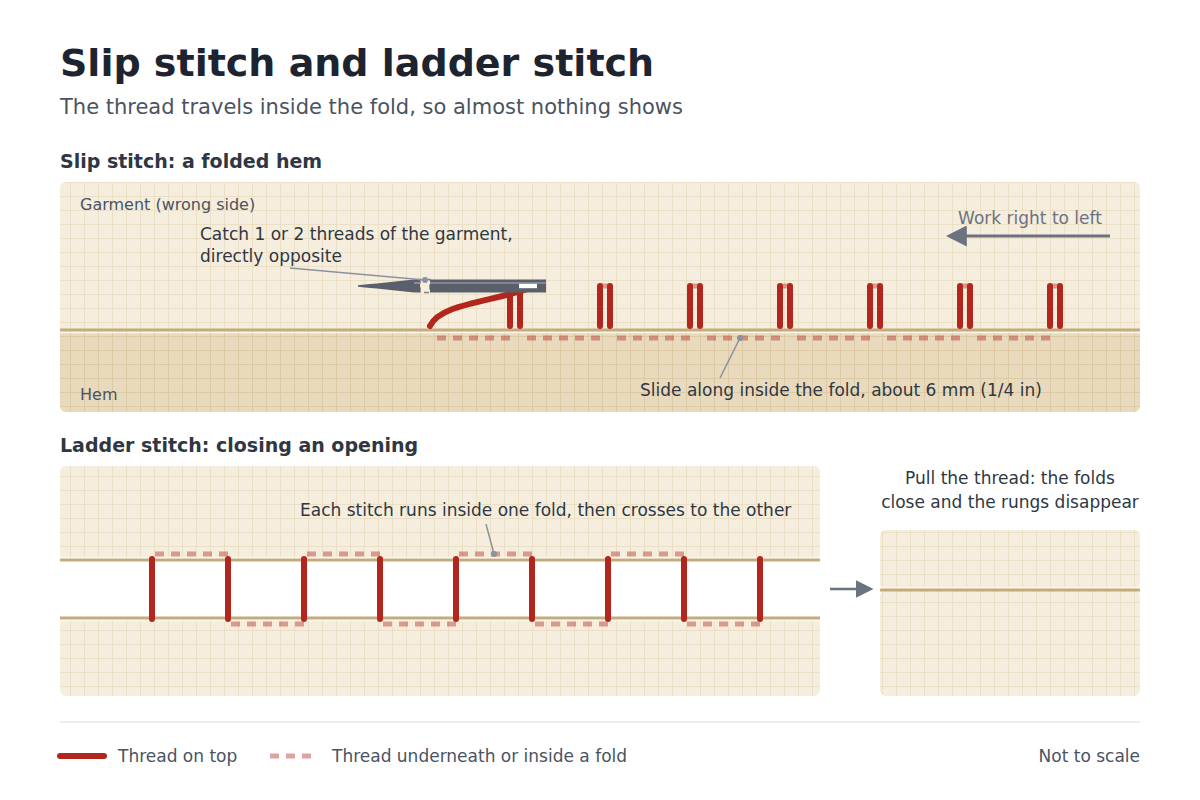
- Work from right to left, holding the folded edge in your left hand.
- Bring the needle up through the fold, so the knot is hidden inside it.
- Take a stitch into the garment directly opposite the point where the thread came out, catching one or two threads.
- Slip the needle back into the fold and along it for about 6 mm (1/4 in), then bring it out.
- Continue, with the stitches about 6 mm (1/4 in) apart.
Common faults. Too much fabric caught in the garment, so the stitches show on the right side. Stitches too far apart, so the hem droops between them. Thread pulled tight, which puckers the hem line.
Whipstitch
Whipstitch, also called overhand stitch, passes over two edges held together, so the thread lies in slants across them. It joins two finished or non-fraying edges: felt, patchwork pieces sewn over paper templates, the opening of a cushion, ribbon and lace. Many books use “whipstitch” and “overcast stitch” for the same movement; here whipstitch joins two edges and overcast finishes one.
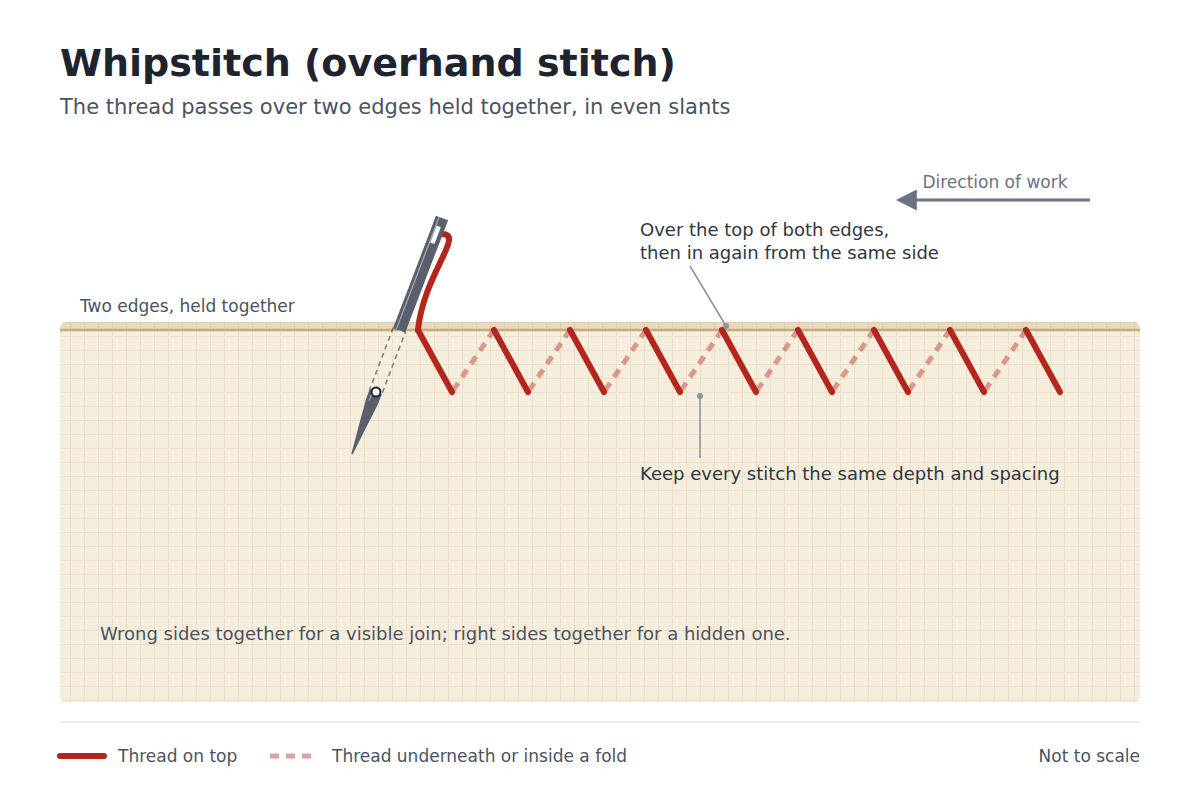
- Hold the two edges together, wrong sides facing for a visible join or right sides facing for a hidden one.
- Hide the knot between the layers and bring the needle out close to the edge.
- Take the thread over the top of both edges and insert the needle again from the same side, a short step along, through both layers.
- Keep the depth and spacing of every stitch the same.
- Pull just firmly enough for the edges to meet.
Common faults. Stitches too shallow, which pull out of a soft edge. Stitches pulled tight, which raise a hard ridge along the join. Uneven spacing, which is obvious because whipstitch is meant to be seen.
Overcast stitch
Overcast stitches wrap over a single raw edge to stop it fraying. It is the hand version of what an overlock machine does with a class 500 stitch, and it is the way to neaten a seam allowance in a fabric that frays when no machine is at hand.
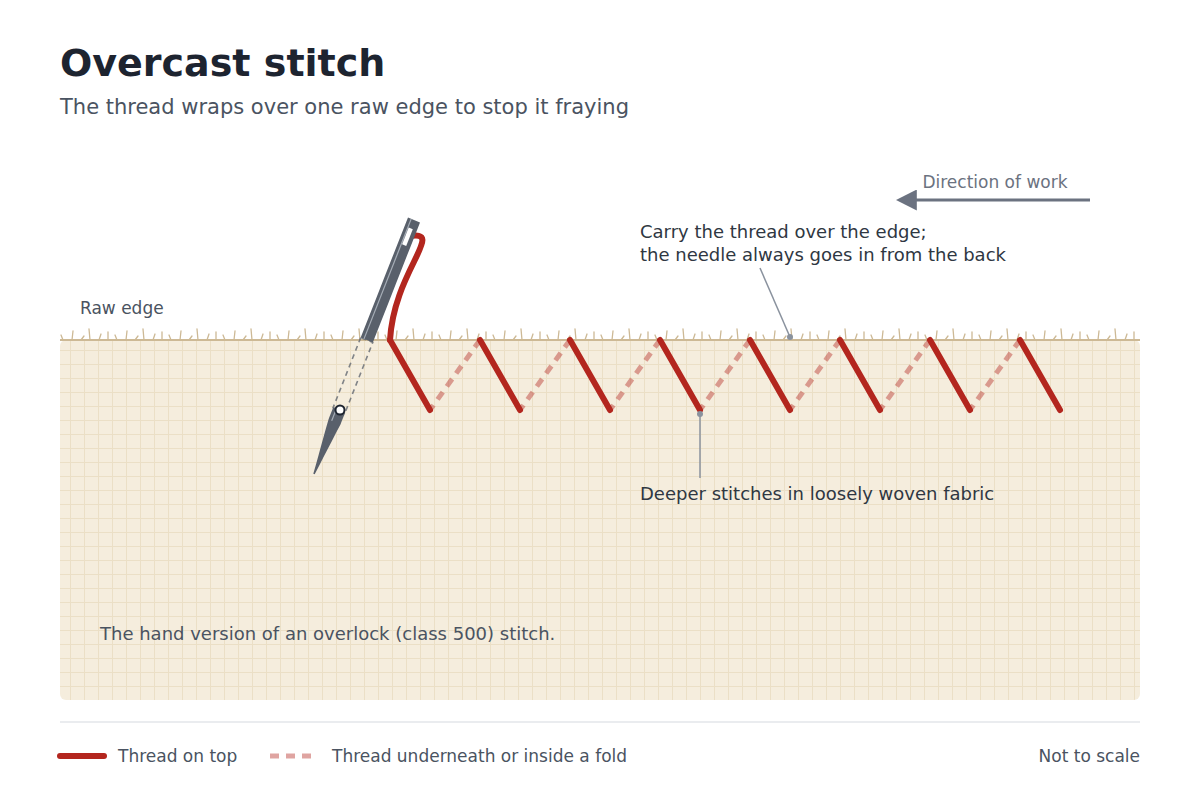
- Trim the raw edge straight, removing loose threads.
- Bring the needle out from the back, a little in from the edge.
- Carry the thread over the edge and insert the needle again from the back, a short step along.
- Repeat at even spacing, taking deeper stitches in loosely woven fabric.
Common faults. Stitches pulled tight, which roll the edge over. Stitches too shallow, which fray out with the edge. Stitches too far apart, which leave the edge free to fray between them.
Blind hem stitch
The blind hem stitch, or blindstitch, is worked inside the hem, between the hem edge and the garment, so it hardly shows from either side. Use it for hems on trousers, skirts, jackets and curtains. Garment factories make the same kind of hem by machine with the class 103 blindstitch described below.
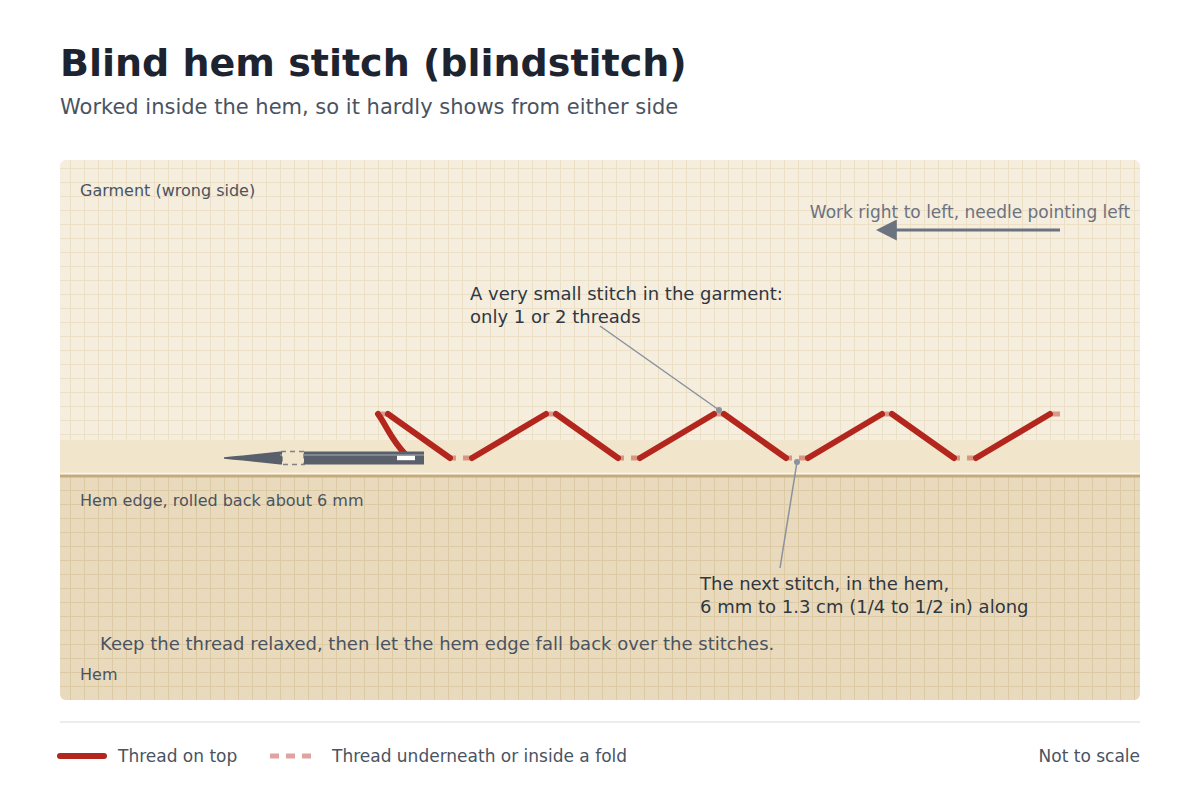
- Work from right to left with the needle pointing left.
- Roll the hem edge back about 6 mm (1/4 in).
- Take a very small horizontal stitch in the garment, catching one or two threads.
- Take the next stitch in the hem, 6 mm to 1.3 cm (1/4 to 1/2 in) to the left of the first.
- Continue alternating, keeping the stitches in the garment very small and the thread relaxed, then let the hem edge fall back over the stitches.
Common faults. Bites in the garment too large, so the stitches show. Thread pulled tight, which leaves a row of dimples along the hem on the right side. For thread planning on a machine blind hem, the blind hem thread calculator works from stitch density and the thread path of each stitch.
Catch stitch (herringbone stitch)
Catch stitch is a row of small horizontal stitches taken alternately in the hem and in the garment, with the thread crossing between them. The crosses give the stitch some stretch, so it suits hems in knits, and it holds a raw hem edge, a facing or an interfacing flat. Worked on the surface for decoration it is called herringbone stitch. The blind catch stitch is the same stitch worked inside the fold, like the blind hem stitch.
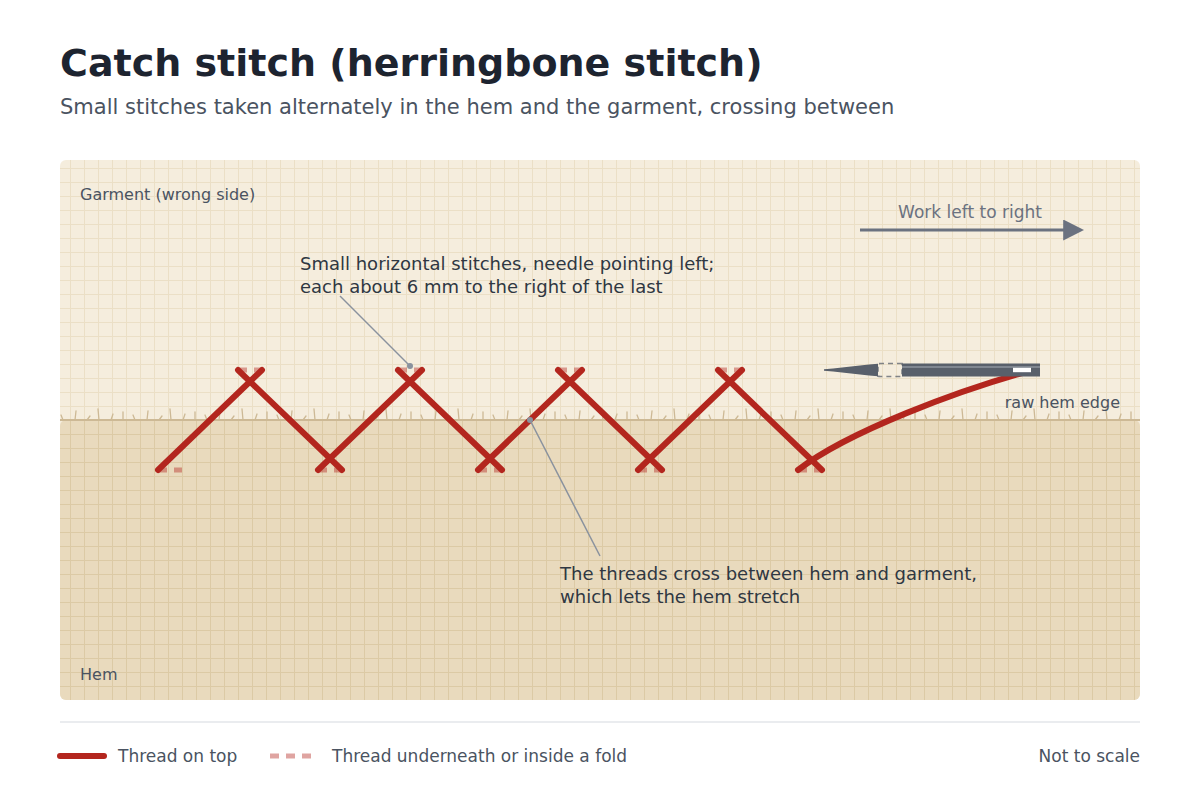
- Work from left to right, with the needle pointing left.
- Take a small horizontal stitch in the hem edge.
- Take another small horizontal stitch in the garment, about 6 mm (1/4 in) to the right of the first, so the threads cross.
- Alternate between hem and garment in a zigzag to the end of the hem.
Common faults. Thread too tight, which removes the stretch the stitch exists for and ridges the hem. Garment stitches too big, which show on the face. Uneven spacing, which makes the crosses lopsided.
Hemming (slant hem) stitch
The hemming stitch catches a thread or two of the garment and then the edge of the folded hem, so short slanting stitches lie on the inside and tiny dots show on the outside. It is the fastest way to hold a hem by hand, and it is also used to finish a binding on the inside or to fell a lining in place. Because the slanting stitches are exposed on the inside, they wear sooner than slip stitches or a blind hem on a hem that rubs.
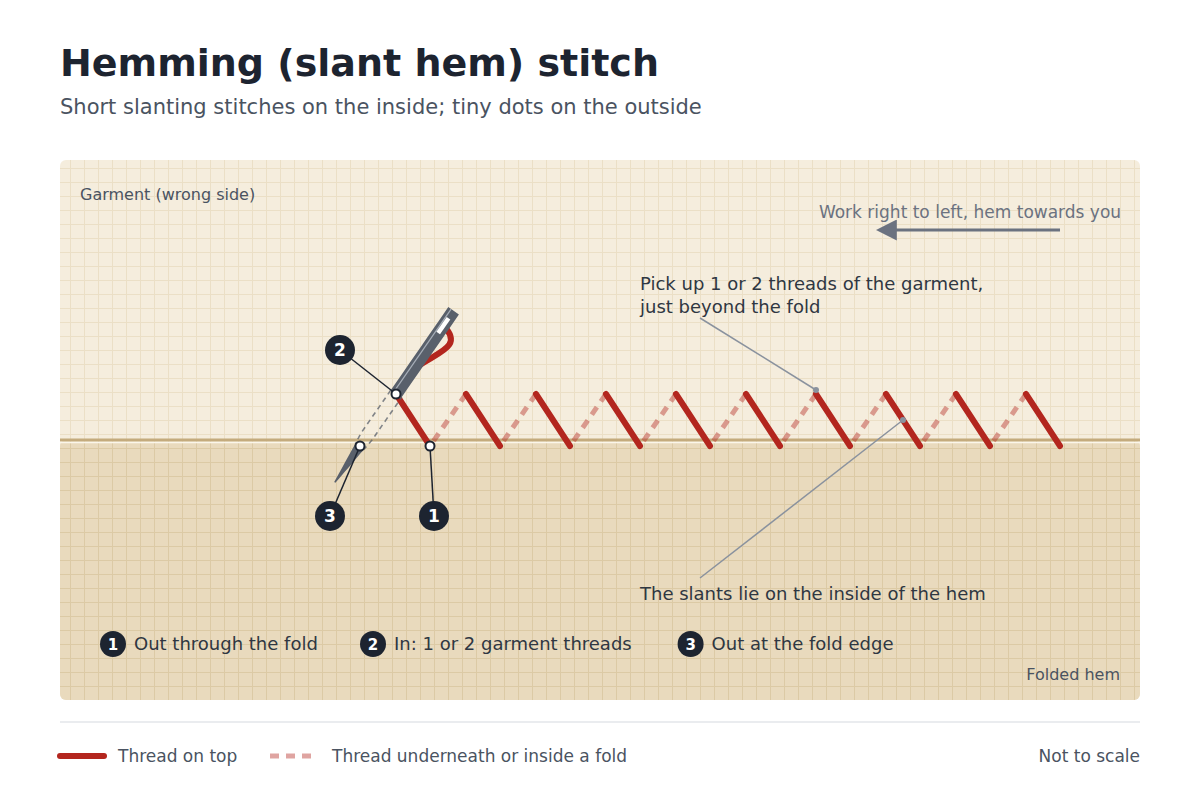
- Fold and press the hem, and pin or baste it in place.
- Work from right to left with the hem towards you, and bring the needle out through the fold, hiding the knot inside it.
- Pick up one or two threads of the garment just beyond the fold.
- Bring the needle up diagonally through the edge of the fold, a short step to the left.
- Repeat at even spacing to the end of the hem.
Common faults. Garment bites too big, so the stitches show outside. Thread pulled tight, which puckers the hem. Stitches spaced too widely, so the hem edge lifts between them.
Blanket stitch
Blanket stitch is a row of upright stitches whose feet are joined by a thread lying along the edge of the fabric. The needle passes over the working thread on every stitch, which is what makes that edge thread. Use it to finish the edges of blankets and felt, to sew down appliqué with a raw edge, and as a decorative edge.
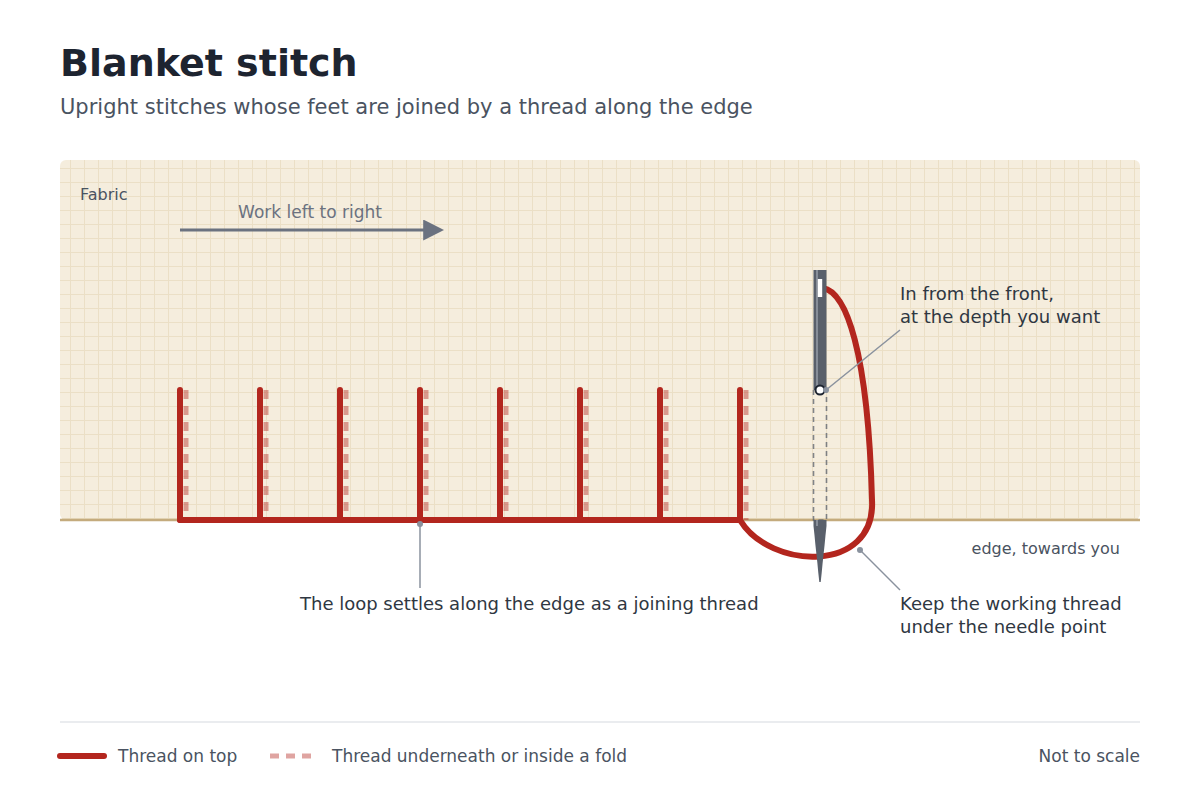
- Work from left to right with the edge towards you. Anchor the thread and bring the needle out at the edge.
- Insert the needle from the front at the depth you want, a short step to the right.
- Bring the needle point out at the edge, directly below, with the working thread lying under the point.
- Pull through so the thread settles along the edge.
- Repeat with the same depth and spacing. At a corner, fan a few stitches from the same hole.
Common faults. Uneven depth or spacing, the most visible fault. The edge thread twisting or sitting above the edge, from a loop that was not kept under the needle point. Stitches pulled tight, which curl a soft edge.
Buttonhole stitch
The tailor’s buttonhole stitch is worked so closely that the stitches touch, and each one forms a small knot, called a purl, on the cut edge. The purls protect the edge from the wear of the button. Embroidery books often use the same name for blanket stitch worked close together, which has no knot. Use the knotted stitch for hand-worked buttonholes, eyelets and cutwork, and to attach shisha mirrors.
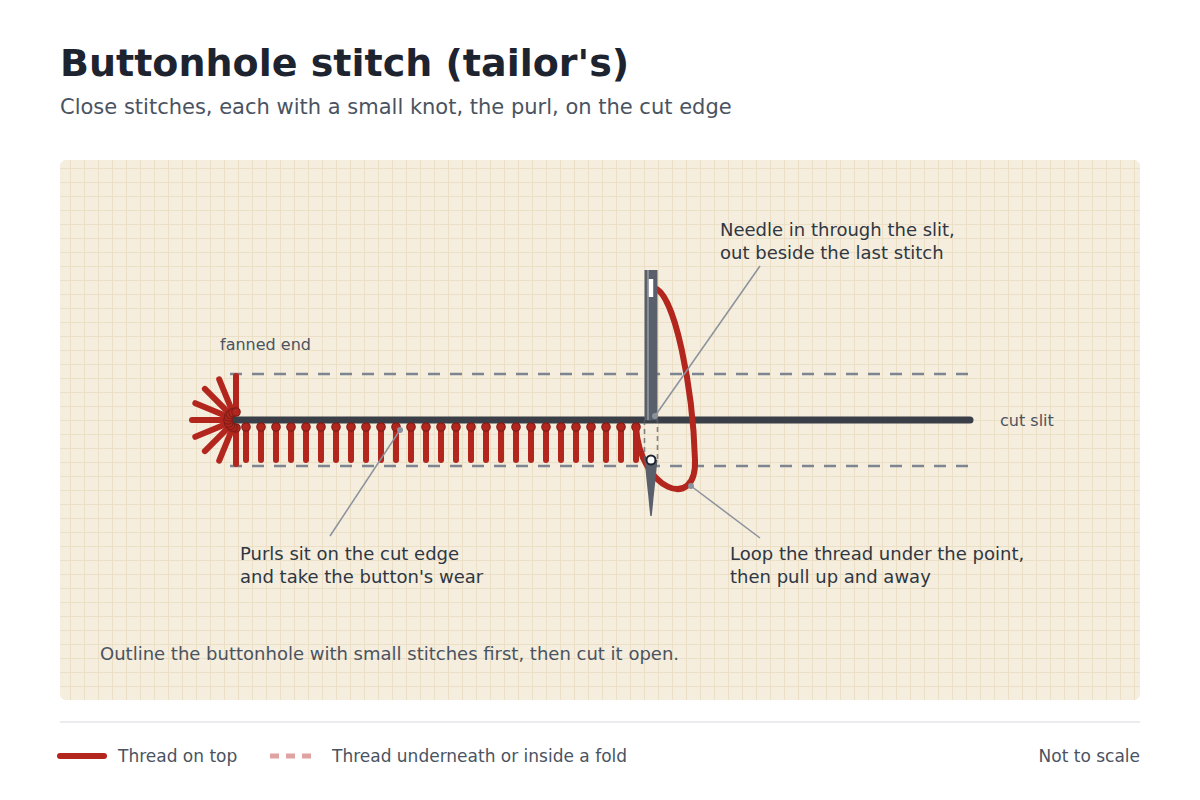
- Mark the buttonhole, outline it with small machine or running stitches a little way either side of the line, and cut it open.
- Bring the needle up from the back, just outside the outline at one end.
- Insert the needle through the slit and bring it out through the fabric beside the previous stitch, at the same depth.
- Loop the thread that hangs from the needle’s eye under the point of the needle, then pull the needle up and away so the knot settles on the cut edge.
- Work along both sides, fan the stitches round the end where the button will sit, and close the other end with a bar of straight stitches.
Common faults. Gaps between stitches that let the raw edge show. Purls sitting below the edge instead of on it. Stitches of uneven depth, which make a ragged buttonhole that frays sooner.
Embroidery stitches in brief
Embroidery stitches decorate the surface rather than hold the cloth together. The ones most courses start with are below, each with what it is used for. The site’s embroidery stitch types page covers them in depth, together with the stitch types used by embroidery machines.
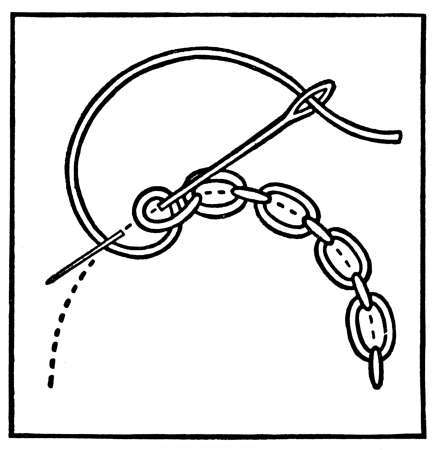
- Chain stitch: a line of looped links for outlines and lettering; worked with a hook rather than a needle, it is the basis of Kashmiri aari work.
- Lazy daisy (detached chain): single chain loops held by a small stitch, for petals and leaves.
- Stem stitch: an overlapping, rope-like line for stems and curved outlines.
- Split stitch: each stitch comes up through the one before, for fine outlines and shading.
- Satin stitch: straight stitches laid side by side to fill a shape with a smooth surface.
- Long and short stitch: satin stitches of staggered length that blend one colour into the next.
- French knot: thread wrapped round the needle to make a raised dot, for eyes, flower centres and texture.
- Cross stitch: two diagonal stitches crossing over a square of the weave, counted to build a picture.
- Feather stitch: open loops alternating left and right, for borders and the seams of crazy quilts.
- Couching: a thick or metal thread laid on the surface and held down by small stitches in another thread.
Machine embroidery uses its own small set of stitch types, chiefly running, satin (column) and fill (tatami) stitches over an underlay, and a design’s stitch count follows from its filled area. The embroidery stitch count calculator works that out, with the top and bobbin thread and the backing each piece consumes.
The six machine stitch classes (ISO 4915)
Industrial stitches are named by number. ISO 4915:1991, Textiles: stitch types, classification and terminology, classifies, designates, describes and illustrates the stitch types used in hand- and machine-sewn seams. Each stitch type has three digits: the first gives its class and the other two its type within the class, so 301 is a type in class 300. In the United States the same numbers appear in ASTM D6193, Standard Practice for Stitches and Seams, which superseded Federal Standard 751a. When two stitch types are formed at the same time, the combination is written with a full stop between the numbers, as in 401.504.
How the threads hold: intralooping, interlooping and interlacing
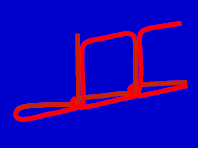
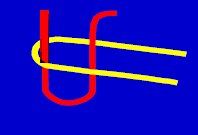
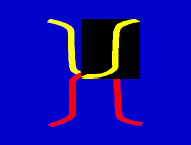
Every stitch type is built from three ways a thread can meet a thread. In intralooping, a loop of thread passes through another loop of the same thread, as in the 101 chainstitch. In interlooping, a loop of one thread passes through a loop of a different thread, as in the 401 chainstitch. In interlacing, a thread passes over or around another thread or its loop, as in the 301 lockstitch.
Class 100: chainstitches
Class 100 stitches are formed from one or more needle threads that intraloop on the underside of the material, with no separate lower thread. Coats describes the 101 single-thread chainstitch as formed from just one thread, used most often for temporary stitching, with the drawback that it runs back from the finishing end if the last loop is not secured. The 103 single-thread blindstitch, a derivative of 101, is used for hemming and lapel padding and shares the same weakness.
Photographs of the 101 and 103 stitches, face and back, are in the stitch class table of the industrial sewing machines guide.
Class 200: stitches that began as hand stitches
Class 200 holds the stitches that originated as hand stitches, formed by a single thread passed from one side of the material to the other. The running stitch and backstitch above belong to this class.
Class 300: lockstitches
In a lockstitch, the needle thread passes through the material and interlaces with a lower thread supplied from a bobbin. Coats calls the 301 single-needle lockstitch the most common stitch type of all. It looks the same on both sides, and it makes tight, strong, low-bulk seams. Its weaknesses are low elongation, so it is a poor choice for a seam that must stretch, and low productivity, because the bobbin holds little thread and has to be changed. Where a lockstitch must stretch, the 304 zigzag lockstitch gives more elongation, at some cost to appearance.

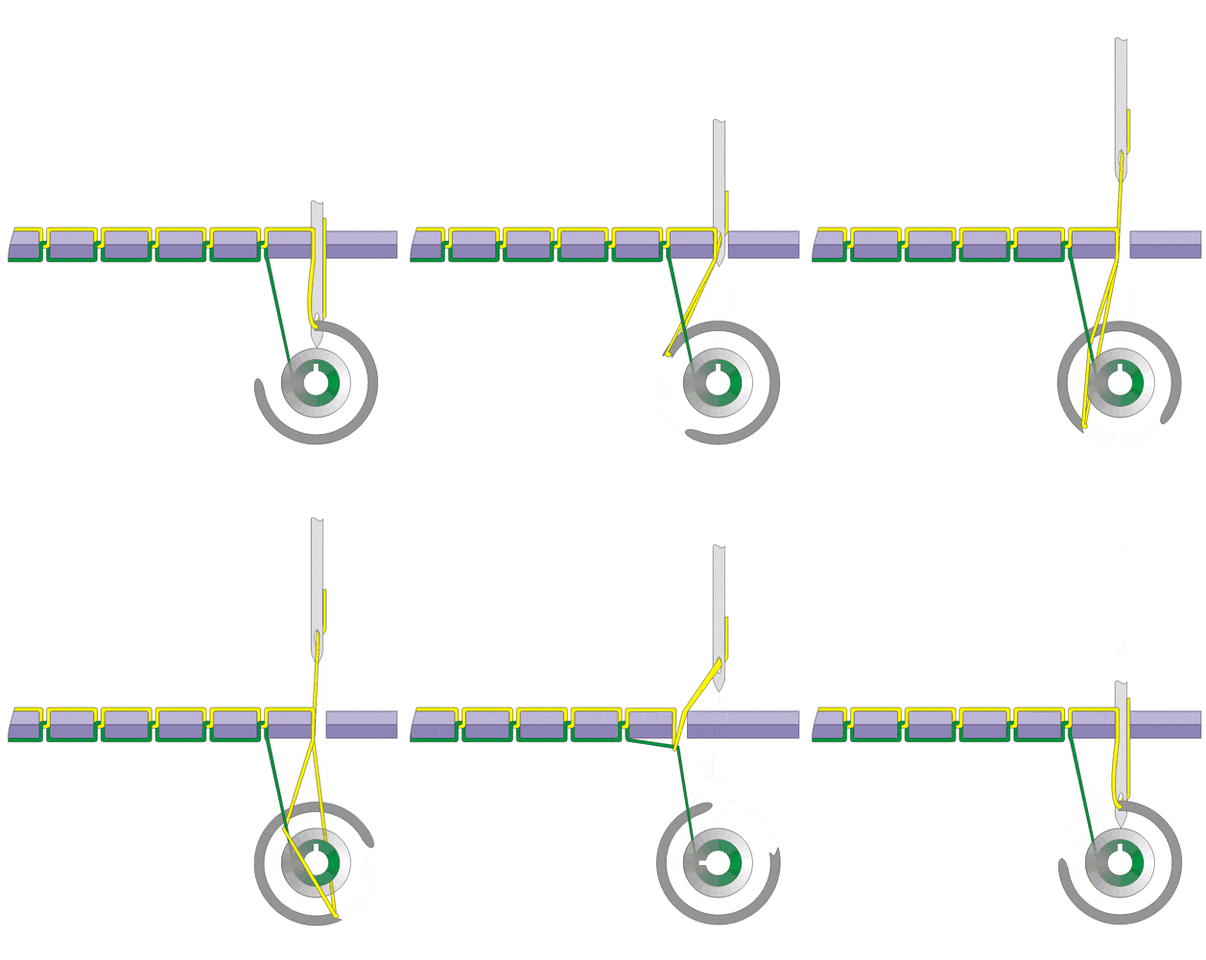
Photographs of the 301 and 304 stitches, face and back, are in the stitch class table of the industrial sewing machines guide.
Class 400: multi-thread chainstitches
Class 400 stitches are formed by two or more groups of threads: needle-thread loops pass through the material and are interlooped and interlaced with looper threads underneath. The 401 two-thread chainstitch gives more seam elongation than 301 and higher productivity, because its looper thread comes from a cone rather than a bobbin, but it is not reversible and can run back if a stitch breaks. Its derivatives are the coverseams: the 406 twin-needle coverseam, two needle threads and one looper thread, is used to hem knitted garments and to attach elastic and lace on underwear, and 407 is its three-needle version.
Photographs of the 401 and 406 stitches, face and back, are in the stitch class table of the industrial sewing machines guide.
Class 500: overedge stitches
In class 500, at least one thread passes around the edge of the material, which is why these are the stitches of the overlock machine, called a serger in North America. Coats sets out the family. The 503 two-thread overedge is for single-ply serging and T-shirt hems, and is not suitable for seaming because it is designed to flatten when the seam is pulled sideways. The 504 three-thread overedge, one needle thread and two looper threads, extends well, does not unravel easily, and is used both to stop fraying and to join plies. The 512 four-thread mock safety stitch and the 514 four-thread overedge (full cover) add a second needle thread. The 516 five-thread safety stitch combines a 401 chainstitch with a 504 overedge: the 401 carries the load while the 504 covers the edge.
Photographs of the 504, 512, 514 and 516 stitches, face and back, are in the stitch class table of the industrial sewing machines guide.
Class 600: covering stitches
Class 600 stitches are formed by two or more groups of threads, two of which cover both surfaces of the material, which makes them flat, stretchy seams for knitwear. In Coats’ descriptions, the 602 is a 406 coverseam with a top covering thread added, for decoration and to protect the top of the seam. The 605 uses five threads, three needle threads, one looper and one cover thread, and is a popular flat, comfortable seam for stretch garments. The 607 flatseam uses four needles, one looper and one top covering thread, and gives flat seams with high elongation.
Photographs of the 602, 605 and 607 stitches, face and back, are in the stitch class table of the industrial sewing machines guide.
The stitch types compared: use and thread consumption
The last column is the total length of thread a stitch uses for each centimetre of seam, all its threads together, from Coats’ thread consumption guide. Coats states that the ratios are measured at 7 stitches per centimetre (18 per inch), that they are the minimum in normal conditions, and that 10 to 15% should be added for wastage on the shop floor. A dash means Coats gives no figure for that stitch type.
| Type | Name | Threads | Typical use | Thread per cm of seam |
|---|---|---|---|---|
| 101 | Single-thread chainstitch | 1 | Basting and temporary stitching | 4.0 cm |
| 103 | Single-thread blindstitch | 1 | Hemming, lapel padding | – |
| 301 | Lockstitch | 2 | Most seams and topstitching in woven garments | 2.5 cm |
| 304 | Zigzag lockstitch | 2 | Lockstitch seams that need more stretch | 7.0 cm |
| 401 | Two-thread chainstitch | 2 | High-output seams that need more elongation than 301 | 5.5 cm |
| 406 | Twin-needle coverseam | 3 | Hemming knits; attaching elastic and lace | 18.0 cm |
| 503 | Two-thread overedge | 2 | Single-ply serging, T-shirt hems; not for seaming | 12.0 cm |
| 504 | Three-thread overedge | 3 | Serging against fraying; joining plies | 14.0 cm |
| 512 | Four-thread mock safety stitch | 4 | Seaming, with an overedge | 18.0 cm |
| 514 | Four-thread overedge, full cover | 4 | Seaming, with an overedge | – |
| 516 | Five-thread safety stitch | 5 | Load-bearing seams with a covered edge | 20.0 cm |
| 602 | Twin-needle coverseam with top cover | 4 | Decorative and protected seams on knits | 25.0 cm |
| 605 | Three-needle coverseam with top cover | 5 | Flat, stretchy seams on stretch garments | 28.0 cm |
| 607 | Flatseam | 6 | Flat seams with high elongation | – |
How much thread a garment’s stitches use
The table shows why stitch class, more than seam length, sets the thread a garment needs: a metre of 516 safety stitch takes eight times the thread of a metre of 301 lockstitch. Two calculators on this site work from those ratios, and the links below open each one with the figures already entered.
Take a garment with 120 cm of 301 lockstitch, 60 cm of 401 chainstitch, 180 cm of 504 overedge and 90 cm of 516 safety stitch, sewn in 30 tex thread with 15% wastage. These seam lengths are assumed for illustration, not measured from a real garment. The thread consumption by stitch class calculator, set to Coats’ ratios, shows 49.50 m of thread in the seams and 56.93 m to issue per garment, weighing 1.71 g. The two overedge stitches account for 43.2 m of the 49.5 m, about 87%, although they cover less than two thirds of the seam length.
For one stitch class across an order, use the sewing thread consumption estimator. For 250 cm of seam per garment, 1,000 garments, 15% wastage and 5,000 m cones of 30 tex thread, sewn in 301 lockstitch the order needs 7,187.50 m of thread, 1.44 cones. Sewn in 504 overedge, the same seams need 40,250 m, 1,207.50 g of thread and 8.05 cones. Coats’ figures are a starting point: thread use rises with stitch density and seam thickness, so unpick a measured length of a sewn sample before buying for a large order.
Judging a machine stitch
A stitch is described by its size: the stitch length, the distance from one needle penetration to the next along the seam, usually given as stitches per centimetre or per inch; the stitch width, the distance between the outermost needle or looper positions; and the stitch depth, between the upper and lower surfaces. Its quality is then judged on tension and balance, elongation and elasticity, recovery, the distortion it causes in the fabric, damage to yarns where the needle passes, and resistance to abrasion. In a balanced lockstitch the two threads interlock in the middle of the plies, as in the diagram above; if they meet nearer one surface, the tension is out of balance.
Seam strength is tested, not guessed. ASTM D1683/D1683M measures failure in sewn seams of woven fabrics, and ISO 13935-2 measures the maximum force to seam rupture by the grab method. On this site, the seam strength and efficiency calculator compares a seam with the fabric it joins, the seam failure mode predictor shows whether a seam will break in the thread or in the fabric and what stitch density moves the failure into the fabric, and the seam slippage calculator relates slippage to the cloth’s cover factor. For running problems on the line, the needle heat build-up predictor and the thread breakage calculator turn speed and breakage rates into numbers. Skipped stitches, puckering, unbalanced and broken stitches, with their causes and remedies, are covered in the guide to industrial sewing machines.
Seam types: ISO 4916 in brief
A stitch type says how the threads are formed; a seam type says how the pieces of fabric are arranged where they are joined. ISO 4916:1991, Textiles: seam types, classification and terminology, is read together with ISO 4915 and sorts seams into eight classes. The descriptions and examples below follow Coats’ guide to seam types. ASTM D6193 uses its own lettered classes instead: SS (superimposed), LS (lapped), BS (bound), FS (flat), EF (edge finish) and OS (ornamental).
| Class | Seam | How the material is arranged | Example |
|---|---|---|---|
| 1 | Superimposed | Two or more pieces laid on each other and joined near an edge | Load-bearing seams in shirts and lingerie |
| 2 | Lapped | Pieces lapped, with edges plain or folded, and stitched through | Jeans and rainwear |
| 3 | Bound | A binding strip folded over the edge and stitched to it | T-shirt necklines |
| 4 | Flat | Two edges brought together and oversewn | Fine knitted garments where bulk must be low |
| 5 | Decorative (ornamental) | Stitches along a line or design on a single ply | Pin tucks |
| 6 | Edge finishing (neatening) | The edge of a single ply folded or covered with a stitch | Serged trouser panels, flies and facings |
| 7 | Attaching separate items | A component added to the edge of a piece | Elastic on the edge of briefs |
| 8 | Single-ply construction | One piece of fabric turned in on both edges | Belt loops and belts |
Choosing a seam type, a stitch type and a thread together decides a seam’s strength, elasticity, durability, security and appearance; the page on the significance and use of seams on garments covers that choice.
Questions
What are the basic hand stitches to learn first?
There is no standard list. A first set that covers every job is running stitch (joining), basting (holding), backstitch (strong seams), slip stitch (invisible hems and closing), whipstitch (joining edges), blanket stitch (finishing edges) and catch stitch (hems in stretchy fabric).
What is the strongest hand stitch?
Backstitch. Each stitch returns to the end of the one before, so there are no gaps on the face and the stitches overlap underneath, which makes it the nearest hand equivalent of a machine lockstitch.
Which hand stitches are invisible?
Slip stitch, ladder stitch and the blind hem stitch show almost nothing on the right side, because the thread runs inside a fold and catches only a thread or two of the visible fabric. Prick stitch shows only tiny dots.
What is the difference between a lockstitch and a chainstitch?
A lockstitch (301) interlaces a needle thread with a bobbin thread inside the fabric, looks the same on both sides and does not unravel, but stretches little and stops when the bobbin runs out. A chainstitch (101 or 401) is formed by loops on the underside, stretches more and sews faster from cones, but it can run back if a stitch breaks or the end is not secured.
Which stitches does an overlocker (serger) sew?
The class 500 overedge stitches: 503 with two threads, 504 with three, 512 and 514 with four, and the 516 safety stitch with five, which adds a separate 401 chainstitch beside the overedge.
Sources and corrections
Every source below was read on 5 October 2026. Standards are cited to their catalogue entries and to the records on this site, which give scope and context but never reproduce a standard’s text.
- Hand stitch methods and lengths: Singer Reference Library, Hand stitching techniques, republished by the Sewing & Craft Alliance.
- Temporary, permanent and decorative stitches: National Institute of Open Schooling, Basic Stitching Skills (461), training schedule.
- Stitch types, seam types and thread consumption: Coats, Basic stitch types, Seam types and Thread consumption guide.
- Standards: ISO, ISO 4915:1991 and ISO 4916:1991 catalogue entries; ASTM, D6193 catalogue entry; FED-STD-751A, recorded as superseded by ASTM D6193; and the site’s records for ASTM D1683/D1683M and ISO 13935-2.
- Images: lockstitch diagram by Anthony Atkielski and cable chain stitch by Grace Christie, both public domain; lockstitch animation by NikolayS, CC BY-SA 3.0; all via Wikimedia Commons.
Change log. 5 October 2026: rewritten in full as the site’s page on types of stitches, answering with the hand stitches first and then the machine stitch classes, seam types and thread consumption. The survey of world embroidery traditions that this page used to carry moves to the embroidery stitch types page. The page now also carries the stitch formation and stitch class material from two older pages on this site. Corrected from those earlier versions: buttonhole stitch is not simply blanket stitch packed close, because the tailor’s stitch forms a knot on the edge; lockstitch has low elongation and is not the stitch for seams that must stretch; and the zigzag chainstitch is 404, not a second 402. The worked examples use this site’s calculators as they stood on this date, set to Coats’ published ratios.
Found an error? Please tell us through the contact page, naming the section and the source that disagrees.





What would be most helpful for a patch on like a shirt or jacket pls I am a new begiiner Freak Circus. I have never sewed a day in my life maybe on eve when I was with my grandma. I am 13 btw…