
Introduction
Natural indigo is now being used by several fashion retail giants such as H&M on a large scale to replace synthetic indigo dye for developing safe, green, and sustainable jeans. Since natural indigo originates from natural resources, it is treble the cost of synthetic indigo dye. Clear evidence of dyeing fabrics with natural indigo is needed to prevent adulteration and protect the interests of consumers. Natural indigo is easily oxidized to indirubin during the extraction process, so the presence of indirubin and other unknown impurities is a key feature of natural indigo dye. In this regard, an in-depth understanding of similarities and differences in the molecular structures features and various vibrational spectra of indigo and indirubin molecules is critical for establishing the authenticity of natural indigo dye.
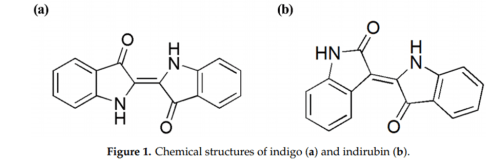
Indirubin, an isomer of indigo, which is an effective component of an anti-leukaemia agent, also has pharmacological effects such as sterilization. The difference in molecular structures of indigo and indirubin gives rise to different physical and chemical properties as well as their applications. Indigo and indirubin with the molecular formula of C16H10N2O2 have a molecular weight of 262.6 Daltons, both of which have a double indole structure. Indigo is a planar molecule with an asymmetrical trans structure and a strong conjugation effect, in which two intramolecular hydrogen bonds are formed between the adjacent carbonyl groups and the amino groups. Indirubin is an asymmetric structural isomer of indigo by condensing two indole rings. In their production processes, the conditions of reaction should be strictly controlled in order to avoid the interconversion of indigo and indirubin.
The primary use for indigo is as a dye for cotton yarn, mainly used in the production of denim cloth suitable for blue jeans; on average, a pair of blue jeans requires just 3 grams (0.11 oz) – 12 grams (0.42 oz) of dye to produce. Smaller quantities are used in the dyeing of wool and silk.
Molecular Structures and Spectral Properties of Natural Indigo and Indirubin
Indigo dye Structure
As shown in Figure 1, indigo and indirubin with the molecular formula of C16H10N2O2 have a molecular weight of 262.6 Daltons, both of which have double indole structure. Indigo is a planar molecule with an asymmetrical trans structure and a strong conjugation effect [4], in which two intramolecular hydrogen bonds are formed between the adjacent carbonyl groups and the amino groups. Indirubin is an asymmetric structural isomer of indigo by condensing two indole rings. In their production processes, the conditions of reaction should be strictly controlled in order to avoid the interconversion of indigo and indirubin.
indigo and indirubin from natural resources comprehensively characterized their spectral properties and analyzed the relationship between the luminescent mechanism, spectral characteristics, and molecular structures of the two molecules. Accordingly, the FTIR, Raman, UV-Visible, and fluorescence spectral properties of indigo and indirubin have been measured and calculated. It is expected that this study could provide a reference for the spectral analysis of indigo and indirubin and lay the scientific basis for the assessment of purity and identification of natural indigo dye.

What Is Indigo blue dye?
Indigo is a type of blue dye that originate from India and is generally used for colouring cotton yarn which is used for the production of denim cloth for blue jeans.
Most people are not really familiar with indigo dye or with indigo in general. However, indigo dye is a natural, organic dye that is extracted from the indigo plant. For a long time, the most common usage of this blue dye was for dying blue jeans.
Now that we’ve answered the what is indigo question, it is important to note that not all blue jeans are actually made from natural indigo dye. In fact, most of the jeans on the market today, especially the cheaper ones, are made from synthetic dyes. Indigo is also used for dyeing wool and silk. After that term passed through Italian dialect and then into English as the word “indigo”.
Indigo was a natural dye extracted from plants but now it is synthetic. Dr Munirenkatappa Sanjappa had done his doctoral thesis on the indigo plant species. He was the Deputy Director of India’s most important herbarium and shared his own story of how he had camped at 17,000 feet altitude for forty days and daily climbed to 20,000 feet to find and gather his collection.
There are 62 varieties in India and he collected 58 of them. (The main species name is Indigofera Tinctoria). What is True Indigo? Indigofera is a genus of over 70 species of plants, many of which go by the common name “indigo.” Indigofera tinctoria often called true indigo or simply just indigo is probably the most famous and widespread dye plant in the world.
It’s Indigofera tinctoria, however, that gives indigo colour, so named for the deep blue dye it produces, which has been used for thousands of years. One of those plants is Indigofera tinctoria which is native to India which was the earliest major centre for the production and processing of indigo dye. Other Asian countries like China, Japan and South-East Asian nations also used indigo for centuries but India is considered the oldest centre of indigo dyeing. Even its name points to that.
The Greek word for the dye, indikón – means Indian. Romans changed that to indicum. After that term passed through Italian dialect and then into English as the word “indigo”. The first synthetic indigo dye was made by German chemist Adolf von Baeyer in 1878 but a synthesis of indigo those first tries was impractical. Experimenting continued and the first commercially practical synthetic indigo was made in 1897. choosing naturally dyed jeans is better for the environment and safer and healthier for everyone. Plus, naturally dyed jeans tend to last longer than synthetic-dyed jeans, especially when properly cared for.
Sources
Indigo is obtained from plants that contain the indican molecule. These belong to different plant families; the most common are of the genus Indigofera, but they also belong to others including the buckwheat family, the Lonchocarpus cyanescens found in Africa, or the Indonesian Marsdenia, and of course Woad. Although the indican molecule is contained in all these plants, producing the traditional blues requires more than merely steeping fibres with the plants in a pot full of water.
Synthetic Indigo
Synthetic indigo, prepared in the laboratory, contains the identical molecular structure to the natural indigo, but it has a much higher percentage of indigo per weight than the natural form. It is necessary to use only 1/4 to 1/3 as much synthetic indigo as natural. The powdered form is easiest, as the lump indigo must be ground or pounded to reduce it for use.
Extracting the Colour from Indigo
Although the indigo powder is blue, the indigo molecule does not produce its blue colour until it is oxidised. The indigo blue powder must be dissolved in an alkali bath with the combined oxygen removed. This is done by adding spectrolite (thiourea dioxide) to the indigo vat during its preparation. Indigo is only soluble in an alkaline solution made by dissolving sodium carbonate (as Soda Ash or Washing Soda) or caustic soda in water. The resultant solution is yellow-green in colour.
The alkalinity of the solution is controlled by the amount of Soda Ash dissolved. This can be tested with the Universal Indicator Paper. The pH needs to be between 9-11. At pH 11 it is easiest to reduce the indigo and will be best for dyeing cellulose fibre such as cotton, linen and viscose. A level of pH 9 is gentler on silk and wool and the Soda Ash should be added in increments to test the alkalinity until this level is achieved. For your first indigo bath, it helps to work at the higher range but not above pH11 and wash the dyed fabric in vinegar as the final rinse.
The alkalinity of the solution is controlled by the amount of Soda Ash dissolved. This can be tested with the Universal Indicator Paper. The pH needs to be between 9-11. At pH 11 it is easiest to reduce Hank dying procedures.
Indigo dying procedures, technology and dye recipe.
Clariant recommends recipes –Indigo dyebath should be controlled by means of chemical parameters such as pH and reduction. Significant changes in these values could make way for variations in the reaction’s oxidation-reduction kinetics, which in turn might lead to differences in the diffusion of colour, shade and intensity. The passage of yarn through a denim range consists of impregnation in preparation, dyeing and washing vats.
The indigo is applied to the yarn by means of repeated impregnations and then passed through the sky to become gradually oxidized. After impregnation and squeezing in the squeezing mangle, the yarn should spend some time in the air duct, where the indigo dye becomes gradually oxidized. It becomes insoluble and fixed on the yarn by means of weak bonds (Eg Van der Waals bonds). This way the indigo is deposited in as many layers on the yarn, as impregnations take place.
In any case, the final effect of indigo on the yarn is superficial, due to the low diffusion of the dye. Regularity and consistency throughout the process are the main goals during dyeing. This implies controlling the parameters which considerably influence this regularity. Temperature: Diresul® RDT Liq dyes are used together with reducers such as Reducing agent D PW. It means that the minimum application temperature has to be 60ºC and the maximum temperature 90º-95ºC and it should be maintained constant.
Diresul® RDT Liq dyes have greater cotton affinity and exhaustion at elevated temperatures. That is why variations of ±10 ºC during the dyeing produce shade intensity differences. Dye concentration: due to the affinity of Diresul® RDT Liq dyes (pre-reduced liquid dyes) the dye concentration in the bath requires control, which is carried out visually in various ways:
- By taking a sample of the thread (once the yarn is dyed) from any part of the denim range
- By using an online spectrophotometer (colourimetric control of the yarn while it circulates in the denim range). This is visual colour control.
- By taking a dyebath sample every now and then and applying it on yarn or fabric in the laboratory.
During denim dyeing, the initial concentration of the sulfur dye should be reinforced both in the case of dry on wet as well as wet on wet dyeing. To adjust the concentration of the feed it is possible to use the Clariant feed-up program. Speed: this parameter influences the time of contact of the fibre with the bath. The longer the contact, the greater the bath-material exchange and, consequently, a greater intensity of the dyeing and diffusion of the dye in the fibre. pH and the Redox potential in the dye bath: Diresul® RDT Liq dyes are in a soluble and pre-reduced state.
This implies that they already themselves present alkalinity and a sufficient and stable state of reduction in their liquid form. It is very important to keep this reduced state in alkaline conditions in the dye bath. That is why Clariant recommends recipes that assure optimal conditions of the dye bath during the entire process. Closed dye vat which can be used for both indigo as well as for sulfur dyes the pH and Redox potential values should fit between the following margins: pH: 11.5- 12.5 Redox Potential: -600 to -750 mV. Depending on the recipe and the conditions of application, the pH can be a little higher.
Foam Indigo Dyeing of Cotton Yarns: New Technology for an Ancient Dye
The research reported here developed a foam dyeing system that eliminates the oxygen until the dyeing process is completed and the yarns are ready to be oxidized. Results to date have demonstrated that speed of the dyeing process can be multiplied, dye uptake and dye fastness improved, water and energy use greatly reduced, floor space required for dyeing dramatically reduced, and all without the use of the sulphur compounds.
Dyeing in a nitrogen atmosphere
The nitrogen technology ensures less environmental impact and more efficiency during indigo dyeing. With its high concentration in the dye bath and under a nitrogen atmosphere, the dye diffuses and migrates more intensely into the fibre than in the case of conventional comparable procedures. The yarn can absorb three times more dye in a dye vat. In this way, it is possible to reduce the number and length of vats, with positive effects on the environment.
The chemical consumption can be reduced considerably, a minus of 50% is possible when using hydrosulphite and caustic soda, and there is also less yarn waste. Moreover, due to the good fixation of the dyestuff on the fibre, considerably less water is required during the washing process.
Production with reproducible parameters with natural indigo dyes
Karl Mayer took over the patents for the innovative indigo dyeing technology from Master in 2018. There followed extensive works for further development and fine-tuning. One of the milestones in this context was the putting into operation of a pilot machine at the Denim Competence Center in Mezzolombardo, Italy, at the beginning of this year. The dyeing system maps the industrial production process at a scale of 1:10 and it has already supplied the first warp beams. These beams were processed by an Italian partner from the weaving industry, the result being highly promising jeans samples.
Enzo Paoli, Managing Director of Karl Mayer Rotal, wants to now use these fabrics in order to gain the interest of denim manufacturers in the innovative Green dye technology: “Only with samples produced under realistic fix running parameters can convince the market.
Why is Indigo different? It is not water-soluble. It is a substantive dye, needing no mordant, yet the colour achieved is extremely fast to washing and to light. Indigo is one of the most ancient and revered of all dyestuffs. The three recipes here all tell you how to dissolve Indigo, and how to dye with it. Deeper history and chemistry may be found in any good dye book.
Recipe #1 and Recipe #2 are quick, reliable, and very colourfast. Recipe #3, the fermentation method, is slower and less certain—but it’s the easiest method to start with.
Recipe #1: INDIGO HYDROSULFITE VAT
First a note about the chemicals. They should be treated with care and common sense but without panic. Keep them dry, out of children’s reach, away from food and use clean dry utensils for measuring. Always measure the water first, into a clean container; then add the chemicals to the water, so that you start with a weak solution and gradually get stronger.
MATERIALS:
- 2-quart glass or enamel pan
- candy thermometer
- enamel dyepot
- stirring rod
- 2 glass jars — 1-quart size
CHEMICALS:
- Sodium Hydrosulfite (or Thio-Urea Dioxide)
- Sodium Hydroxide (also known as LYE)
- Natural Indigo, powder or cake or paste (Cake Indigo must be pulverized before you can dye with it.)
CAUTIONS:
Lye is very caustic. Wear rubber gloves, don’t splash, especially keep out of eyes.
Solution One: Sodium Hydroxide (LYE)
- ¾ ounce Sodium Hydroxide (LYE)
- ½ cup Water
Put the water in a glass jar that has a close-fitting lid. Slowly add the Sodium Hydroxide while stirring. The Solution may get quite hot. This is a strong alkali and should be handled very carefully. Close and label the jar. This can be kept indefinitely but should be clearly marked. If any gets on your skin, wash with lots of water.
Solution Two: Sodium Hydrosulfite
- 2.5-ounce Sodium Hydrosulfite, and 1-pint water
- or ¾ ounce Thio-Urea Dioxide (also called Spectralite), and 1-pint water
Put the water in a quart jar. Add the Hydrosulfite (or Thio-Urea. Stir gently to dissolve. Hydrosulfite will generate an unpleasant odour, and will keep for a few days only; the Thio-Urea should be good for several weeks. Close up and label the jar.
Solution Three: Indigo Stock Solution
- 1-ounce Indigo
- ½ cup of Solution 1
- ½ cup of Solution 2
In a glass or enamel pan, stir one-ounce Indigo Powder into ½ cup water, until thoroughly moistened. Stir in ½ cup of Solution 1. Dilute to one quart with water (add about three cups of water); and heat to 120°-130° F (never above 140° F). Add ½ cup Solution 2, and let stand 30 minutes. At this point, you should see a yellowish solution beneath the blue surface (Indigo on the surface will oxidize back to the blue insoluble form). A drop of this solution running down a glass surface should turn blue in 20-30 seconds.
PREPARE THE DYE VAT:
- 1 oz of Indigo Stock (Solution 3)
- 2 oz of Sodium Hydrosulfite Solution (Solution 2)
In your large enamel dye pot, heat 2–3-gallon water to 120° F. Add 2 ounce (about 4 tablespoons) of Solution 2. Let stand 10 minutes. Then add 1 ounce (2 tablespoons) of Indigo Stock Solution. Let stand 30 minutes.

This should be clear and yellowish and is now ready for use. Enter the washed, wet fibre (preferably soaked overnight). Avoid making bubbles, and stir only enough to submerge the fibre. After 30 minutes–with occasional light stirring–lift the fibre out without squeezing and allow to oxidize (hang it up) for another 30 minutes. Repeat this dipping and airing pattern until the desired depth of colour is reached.
Add more Indigo Stock Solution–2 ounces at a time–as needed for colour. If you are dyeing large skeins (4 ounces or more), use 4 ounces of Stock Solution so that the dyebath won’t be depleted as rapidly. If the dyebath turns blue, add another 2 ounces of Solution Two and allow to stand for 15 minutes. Always keep the dyebath at 120°-130°F. After about four additions of Indigo Stock Solution to the exhausted dyebath, the chemistry gets tired and complex. It’s simplest to start a new vat.
RINSING YOUR WORK:
When the dyeing is done, treat the fibre to neutralize any remaining alkali, and to set the dye. First rinse in lukewarm water with about one cup of vinegar added. Next rinse in cool water. Wash gently in hot soapy water. Finally, rinse in clear water.
Recipe #2: DARK BLUES WITH THE INDIGO HYDROSULFITE VAT
If you want a dark navy, use the increased-strength Stock Solution given below. Prepare Solution 1 and Solution 2 as in Recipe #1.
Concentrated Stock Solution:
- 1 oz Indigo
- 2 tablespoons of Solution 1
- 2 tablespoons of Solution 2
Stir Indigo into 2 tablespoons of water; stir in 2 tablespoons of Solution 1; dilute to one cup with water; heat to 120°-130° F; add 2 tablespoons of Solution 2.
To dye dark blue: prepare vat as before; add 3-4 tablespoons of Stock Solution; dip about ½ pound of Yarn. After every other dipping, add 3-4 tablespoons of fresh Stock Solution. You’ll have a moderately dark blue after the third dip, a very dark blue after the fourth.
Our thanks for the above Recipe to Devin McQueen, Susan Emmons, USDA Bulletin #230, Rita Adrosko’s and Violetta Thurstan’s books.
Recipe #3: INDIGO
YEAST-AMMONIA FERMENTATION METHOD
- 1 tablespoon powdered Yeast (bread yeast)
- 1 cup warm water
- 1 rounded tablespoon Sugar
Combine the above ingredients and let stand in a warm place for about 2 hours. At the same time, dissolve 2 level teaspoons of Natural Indigo in ½ cup non-sudsing Ammonia (let sit for about 2 hours).
Add the Indigo and Ammonia to the Yeast-Sugar mix in a half-gallon jar. Fill to the top with warm water, stir once, cover with plastic wrap, using a rubber band to seal. Don’t use a rigid seal, the fermentation can burst it. Let this jar sit for several days in a warm place. The liquid will clarify to an even yellow.
The Yeast has removed all the oxygen, enabling the Indigo to dissolve. If your jar stays blue, add more yeast (if this doesn’t do it, add more sugar also). When it goes yellow, immerse some pre-wetted Yarn, and leave in overnight. Remove carefully (not dripping into the jar, adding oxygen). Hang in the air for 20-30 minutes. Repeated dips will deepen the colour.
The not-very-pleasant smell will disappear from your dyed goods with the final rinse (see Rinsing, Recipe #1). With thanks to the Boston Area Spinners and Dyers, and to Fred and Willi Gerber.
Don’t be surprised with any of these Recipes if your work fails to pick up colour in the dyebath. It’s not supposed to. The Indigo colour doesn’t bloom until air (atmospheric oxygen) has worked on the Indigo infused fibre. Magical, truly it is.
Dye kits are available. The dye kit contains natural indigo, soda ash, thiourea dioxide, hide glue, and gloves and a mask. It will dye approximately 5 pounds of material or yarns in the deepest indigo shade. In addition, you also need a small amount of sodium hydroxide (lye) to dissolve the indigo.
You need a dye kettle of Stainless steel: Stainless steel kettles are the best quality dye vessels available. They will not alter the colour of any natural dye bath and will virtually last forever. Choose heavy-walled stainless-steel vessels 18/10 gauge. The thin, shiny variety can leach metal which will alter the colour of your dyebath. Making the Extract Stock Solution in Preparation for Dyeing
- Put 2 oz. of natural indigo into a quart glass jar with a wide mouth.
- Add 1/4 cup warm water (80° F) and stir to make a paste.
- Add one more cup of water and stir. The solution should be opaque and blue.
- Add two TBS of an alkali (e.g. sodium hydroxide or lye) to dissolve the indigo. Stir carefully. Always wear gloves, mask and protective eyewear when measuring and using lye. Do not breathe the stock solution vapours after adding the lye to the jar.
- Next, dissolve two TBS thiourea dioxide into nearly boiling water (one cup), add to the stock solution and stir until dissolved. Wear a protective mask and avoid breathing the stock solution vapours. Add enough warm water to reach the neck of the quart jar and stir gently.
- Allow this stock solution to sit for 15 minutes so it can dissolve and reduce. The solution will change from a dark blue to a translucent green-yellow with a coppery scum on the top. Check to see if the stock is ready by dribbling some solution on the side of a white plastic cup and note the change from a transparent green-yellow to a dark opaque blue once oxidized.
This stock can be kept indefinitely if stored in a dark cool place and sealed securely. Natural indigo extract always has a distinctive grassy odour because it is often composted with local organic matter prior to exporting. If the stock turns blue over time, add a scant 1 TBS of dissolved thiourea dioxide.
Check the pH to see that the stock remains pH 11, if not add 2 tsp of lye and stir well. If some of the stock evaporates over time simply add warm water and 1 TBS of dissolved thiourea dioxide, stir well. Wait for 15 minutes until the stock once again reduces and changes colour.
Dyeing with Indigo
- Fill up the dye kettle with warm water; 120°-130 F for wool and silk, 90 – 100F for cotton or linen.
- If you are dyeing protein fibres (silk or wool), follow this next step. In a separate container or jar, soak 3 TBS of hiding glue in lukewarm water until the grains swell, about 20 minutes. Add about two cups of very hot water and stir until dissolved. You will add this hide glue solution once your vat is sharpened.
- Add the one-half cup of dye stock, stir well and note the colour of the dyebath. If after 15 minutes it remains an opaque blue colour, it needs to be sharpened.
- Check the pH of the dyebath with your pH sticks.
- Wool and silk should have (and can have if using hide glue) a pH of 10-11. Cotton and cellulose fibres have a pH of 11.
- If the pH is low, increase it by dissolving ½ cup soda ash in 1 quart of hot water. When it is dissolved, add all of it to the vat and re-check the pH of the dyebath.
- Next, add a little thiourea dioxide that has been dissolved in very hot water. Use 1 teaspoon of thiourea dissolved in 1 quart of very hot water. Add it about ½ cup at a time and wait for 15 minutes for the water to change colour, or reduce. If the indigo water does not change, add another ½ cup of the thiourea solution and wait for it to reduce.
- Once the oxygen is reduced, the indigo water changes colour from blue to a green-yellow. Carefully note the colour because it is an important chemical change that indicates vat readiness. The following colour reference below will help guide your assessment of readiness for dyeing.
- Opaque blue: The indigo bath is not ready for dyeing because of the oxygen in the water.
- Clear blue-green: There is just a little too much oxygen in the dyebath. It is getting closer to being ready.
- Clear greenish-yellow: The indigo bath is perfect; there is no oxygen left.
- Clear yellow: There is an excess of the reducing agent (thiourea dioxide). Do not dye yet! Paddle the bath to reintroduce some air until it turns greenish-yellow.
- The dye bath should be a clear green-yellow (not clear yellow!) with the appropriate pH and temperature for each fibre type before dyeing. If the dye bath is too yellow it is over reduced and dark indigo will be impossible to attain. As well, the excess thiourea will smell quite strongly of sulfur. If this occurs just paddle the dye bath to add oxygen until the colour of the dye bath is correct. Once this has occurred dyeing should commence.
- Add the dissolved hide glue solution to the vat and stir well.
- Add the clean wet cloth, warps or skeined yarn to the dye bath. Keep the goods submerged the entire time and gently move them around under the water for the entire dye period. Hold the goods in the dye bath from a few seconds to three minutes (maximum of five minutes) depending on the depth of shade required, the amount being dyed and the number of previous indigo dips. Basically, the first dips should only be for 30 seconds to one minute. All subsequent dips can be from one to five minutes. Keep track of the number of dips.
- Remove the cloth or yarn gently from the dye bath trying not to drip into the dyebath. Do not squeeze or wring your yarn or cloth. Allow the goods to oxidize (flat) in the shade for 20-30 minutes. Gently open up strands of yarn in the skein to allow oxygen to reach the inside of the fibres. After oxidizing dip again, repeating this sequence until the desired shade of blue is achieved. Keep in mind that at least two values of colour will be lost to rinsing and drying. Therefore, always dye two to three values deeper than required.
- When do you add fresh indigo stock? Often you will need to add ½ to 1 cup stock if you notice that your dips are not getting any darker.
- Where possible, oxidize 24 hours after the last dip and before washing.
Finishing Process
The finishing process includes two steps: neutralizing and washing.
- Neutralize all yarns after indigo dyeing by rinsing in either tannic acid (5 tea bags per pound) for cotton or acetic acid (1/4-cup vinegar per pound) for wool and silk. Soak (110° F) for 15 minutes until the rinse water is between pH 6 – 7.
- Wash the indigo-dyed goods in very hot water (170° F) with a neutral soap (Orvus paste or shampoo) for 20 minutes. Often it requires two to three hot water washings with fresh water to remove the excess indigo. End the process with a series of warm water rinses (no soap) until the colour runs clear and the goods do not crock (rub off).
- Because hide glue has been used to protect the cloth or yarn, they should be soft and supple after the indigo dyeing. Silk should have retained its sheen and strength and wool will be more lustrous than before the dyeing, and it too should be full and lofty.
- Remember that the process of extracting and dyeing with indigo is an art. It is necessary to continuously experiment and make changes until you arrive at your own effective system.
- Conclusion— I have long been fascinated with indigo – the brilliant natural blue dye that has been used throughout human history. Before the advent of chemical dyes, indigo dying was practised throughout Europe, most of Africa, the Middle East, most of Asia, and South and Central America. For me, this attraction has been purely aesthetic. Indigo is used so beautifully in traditional textiles. But once I started delving into the history of indigo (for the purposes of writing this article) I discovered that there is so much more than meets the eye. From being revered almost magical qualities, to a central role in slavery and colonization, to its resurgence in sustainable fashion, the history of indigo is worth getting acquainted with.


