Banswara Garments
Banswara Garments is located in Daman and Surat. The garment units are specialized in Trousers, Jackets and Waistcoat production. It makes the offering of Banswara complete textile vertical. Their team will take you right from conceiving an idea for the fabric to the final product ready to wear in the least possible lead-time.
Capacities

The installed capacity is for about 3, 45,000 pairs of trousers and 37,500 jackets per month. The entire focus of the factory is on producing Trousers and Jackets that are able to match the highest standards of workmanship, quality, and appearance.
Facilities
These factories are equipped with a full complement of machines to be able to manufacture trousers and Jackets of the finest quality. They are doing all their order and material-related work on ERP software VISUAL GEMS. They do all their marking and grading on a CAD system from Rich Peace. The sewing line primarily consists of Juki machines. There are automatic Welting Machines from Durkopp Adler. Curtain Felling Machines from Union Special, Eyelet Buttonhole Machines from Reece and Blind Loop Machines from Maier. The pressing is entirely from Roton D, including leggers, toppers and side seam presses
Product Range
Banswara Garments is specialized in the production of jackets. They are making high-class jackets with all the Fusible that are required in making jackets. Most attractive prices, latest signs and the finest quality are their forte. The products are a class of their own. When it comes to quality and comfort, they can be compared with the best in the world. With innovative styles, they occupy a prominent position in the domestic as well as an international market:
- Men’s trousers(Formal, Casual)
- Women’s trousers(Formal, Casual)
- Children’s casual wear
- Jackets
Planning Department
The planning department plans every style to execution the order within the time limit. Without a time frame garments cannot sustain so the industry follows every task by scheduling. Each order has a delivery date & the production plan department follows the production plan on the basis of the delivery date. They know when fabric & trims in-house in the factory will. Basically, some of the fabric & trims come from Local vendors. So, they plan both options on the basis of the delivery date. So the production planning department follows some of the important tasks in the following.
- Capacity planning.
- Time & Action (TNA)
- PP meeting.
- Order Allocation.
- Manpower & M/C allocation.
- Execution of every task.
- Materials planning & In-house follow-up.
- Delivery Meet.
Capacity planning
The production planning department makes the production capacity of a factory because capacity determined need to order or not. If order capacity is full whole the year then does not take over capacity order because it is needed over cost to make extra capacity order. On the other hand, if the capacity order is not full then take more orders to fill the capacity otherwise factory will be a loser by financing. Production planning department informs forecast capacity order to merchandisers & management so they can inform to the buyer for order.
Time & Action
The planning department follows every style as per schedule. Every order has its own time frame & meet delivery time. Every style follows product development to shipment. It is a job task for the planning department otherwise they cannot meet delivery as per the planned schedule. The planning department takes action very styles to follow up within the time & Action calendar.
| Date | June 10 | July 15 | July 20 | Aug 1-4 | Aug 5-7 | Aug 8-21 | Aug 22-24 | Aug 25-29 | Aug 30 |
|---|---|---|---|---|---|---|---|---|---|
| Operation | Order received, Trims ordered, Fabric ordered | Fabric and Trims in-house | PP | Fabric Inspection | Cutting | Stitching | Press and Packing | Final Inspection | Delivery |
Table 2.2- Time & Action
Scheduling
The production planning department takes decisions when a style is input into line. On the schedule, they cheek fabric & trims with the store department & Merchandising department. If get on-time in-house every item they can input into line. On the other hand if not get fabric & trims on time they can change the line plan to reduce the cost.
PP Meeting
Production planning department cheek particular style fabric & trims status with store & merchandising department. If every item & approval is done then they co-operation with all related departments like as Merchandising, Production, store, cutting, Finishing, quality & buyer representative to make clear understanding for a particular style for production. Before the PP meeting, they cheek all approval, production file, trim card & ready size set.
Order allocation
The planning department does line allocation for every style. When got any order from the buyer they allocation line plan. Without a line plan, an order cannot smoothly run for production. So order allocation is very important for the planning department.
Manpower &machine allocation
The production planning department takes decisions about how many operators need for a particular style to output. They take a decision line layout for a particular style. And also take decision how many machines need to operate the line. Then they take effective decisions for productivity for a particular style.
Materials planning & In-house
The planning department follows up the fabric & trims follow up with the store & merchandising department so they can pre-plan to effective line planning date.
Delivery Date
The production planning department follows the delivery date of garments. If not maintain the delivery of the garments on time it will be loser planning & fall down of the company. So, every style maintains to meet the delivery of the garments. So, they can make effective decisions for garments delivery.
- Planning is done 6 months in advance.
- The merchandiser either goes to fieldwork to collect orders or the order is automatically given by the buyer.
- Planning is done in the reverse process.
Sampling Department
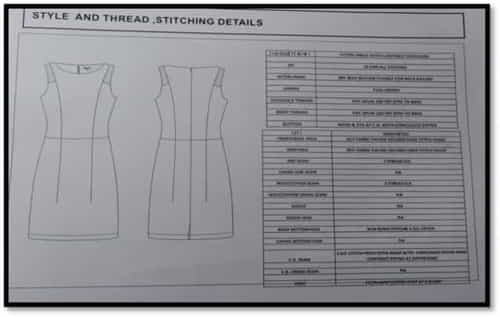
After the confirmation of the order, each sample sent to the buyer has the following details attached to it, with the help of a tag. It contains the details pertaining to both, what the buyer has demanded and what supplement fabric/trims etc. they have used.
- Ref no.
- Colour
- Fabric
- Composition
- Description
- Quantity
- Style no/ Size
- Trims

Sampling Process
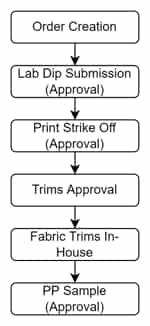
The process of the sample department varies from context to context, and the development process covers a wide range of diverse products. There are different phases of sampling; the first phase covers the development of the initial concept or design idea through its approval by the customer and full review/risk analysis by the development and production teams.
The second phase covers the process following acceptance of the first prototype sample and includes the functions of sourcing and ordering components, testing the product and carrying out trails once the finalized sample specifications have been drawn up, the third and final phase commences. The phase includes a range of activities that are carried out before large scale or bulk production capacity outside the home producer/developers wherever this is applicable.
Development samples or inquiry samples
When they work with some buyers continuously, they have to keep on sending samples to them very often. Whenever they have inquiries, the buyer needs samples. Buyers like to see the garments in new fabric. For one inquiry, they need samples of different fabrics to choose from. If they want to develop a new style of new fabric, then also they have to send these samples.
Salesmen samples or promotional samples
Some buyer needs these samples for getting the orders from their customers. If the buyer is having 7 salesmen in his office, then the buyer will ask us to make 7 samples in each style. The salesmen book the orders from their customers, by showing these samples. Buyer places the order to them accumulating the quantities.
If they sent samples for 5 styles, sometimes, they may get orders for all 5 styles, 3 styles or 1 style. Sometimes, they may not get an order for even a single style. Expected sales may not be possible, due to poor quality, unsuitable colours, improper measurements, unmatched prints or embroidery, etc. of salesmen samples. Or it may be due to local business recession or competition or unsuitable prices. Anyway, they have to make these salesmen samples perfectly with a sincere interest to get orders.
Photo samples or fit samples
These samples are to be made after getting the order sheets. These samples are needed to check the measurements, style, and fit. So they can be made in available similar fabrics but in the actual measurements and specifications.
Some buyers may need these samples if they want to print the photos of garments on photo inlays, packing boxes, hangtag, etc. These samples may be needed for local advertisements or buyer’s promotional occasions.
Pre-production samples
These samples are almost like approval samples. They made it on actual production fabric with actual bulk trims. They represent that the product will be like these samples.
Shipment samples
These samples are sent after shipment. They sent it in actual packing with all labels, tags, etc. Generally, these samples will not be tested by the buyer for anything. And even if they get some comments from buyers, they can save their selves by saying that these samples were sent from the leftover garments after the shipment; hence there might be some mistakes
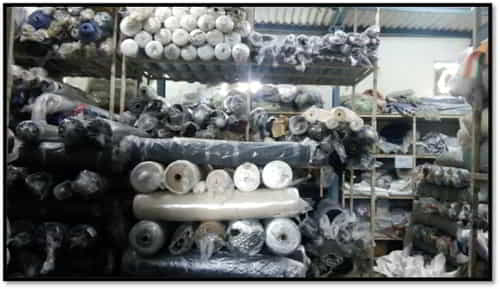
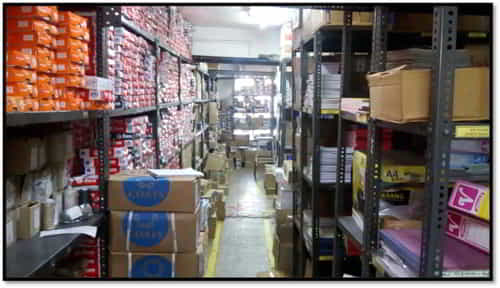
Fabric Store
Based on the fabric consumption, total fabric requirement is generated for an order and the same is sourced from the pre-approved fabric supplier. The fabrics are in-house in the factory.
The fabric is required to check 100% of other sellers or can be 10% only in case of fabric sourced from its own mill. For example, the 4 Point System is used by the factories for fabric inspection.
Some fabric tests like fabric GSM, fabric shrinkage and colour bleeding in washing are done by the factory. If the fabric shrinkage is more than the allowance, fabrics are pre-shrunk for bulk cutting. Sometimes patterns are modified according to the fabric shrinkage.
It is common that when fabrics are sourced in bulk, the fabrics are processed in different lots (batches) depending on dyeing machine capacity. So, there are having shade variations of fabrics of the same colours. To avoid shade variation in garments shade band is prepared by the factory.
Fabric suppliers
- Banswara Mills- Rajasthan
- Arvind Lifestyle- Bangalore
- Arvind Ltd- Madhya Pradesh
- Raymond Ltd- Mumbai
- Raymond Apparel Ltd- Chindwara
- Bombay Rayon Fashion- Boisar
- Reliance Ltd- Mumbai
- Savika Fashion- Mumbai
- SVG- Ahmedabad
- Bhagwan Enterprises- Mumbai
- RSWM- Rajasthan
- Blue Fab- Mumbai
- Nahar Mills- Chandigarh
- Donear- Surat
- Aditya Birla- Bangalore
- Auro Textiles- Baddi
- Dee Jay International- New Delhi
- Grasim- Haryana
- Banswara Mill
- Nihalchal
- Raymond Luxury
- Raymond Limited
- Auro Textile
- Vardhman
- Punit Export
- Nahar Industrial
- O.C.M
Types of fabric
- Woven
- Polyester Viscose lycra
- Cotton Polyester
- Polyester Viscose
- Polyester blended wool
- PV
- Lycra
- Cotton
- Woolen
- Velvet
- Knitted
- Cotton-lycra
Types of Fusing
- Lapel Fusing
- Body Net
- Belt Canvas
- Microdot
- R Fusing
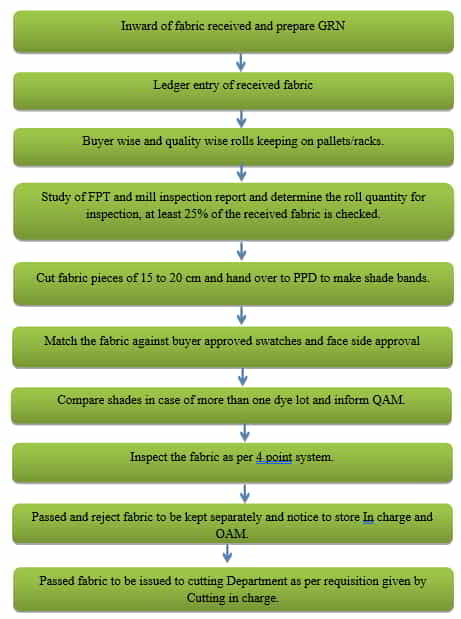
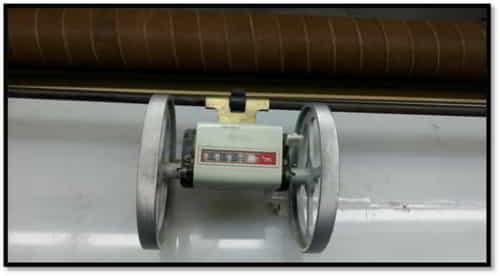
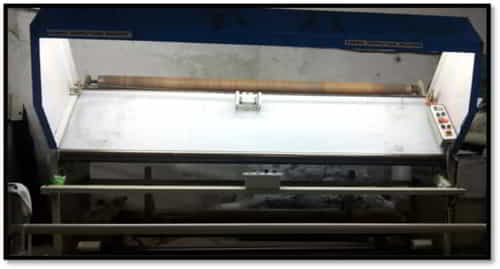
Fabric Inspection
Fabric inspection is the process of checking the fabric sheet for detecting faults in the fabric and preparing an inspection report. After the fabric inspection, grading of the fabric is done according to the fabric quality level.
In fabric inspection, fabric rolls are opened and passed through a fabric checking machine having the light under the fabric and the fabric checker does the visual inspection of the fabric. While checking checker marks the defects with chalk or attach a tag at the selvedge parallel to the defect point. At the end of the checking, a fabric roll inspection report is made for that fabric roll. In fabric inspection, fabric rolls are graded and segregated by marking rolls either one of the following categories:
- Passed: These fabric rolls are ready for use
- Rejected: Not acceptable. rejected fabrics are sent back to the supplier
- Decision pending: Awaiting approval from the authorized person whether to pass or fail or reject the fabric.
To use 4 point system following things should be known
- Fabric inspection method or preparation
- Criteria of giving penalty points based on defects and defect length.
- Calculation method of total penalty points for total defects found in a fabric roll.
- A Check sheet or format for recording data
- Knowledge of different types of defects (how a defect looks and its appearance)

Trims Store
Similar to fabric sourcing all required trims and accessories are purchased. Trims and accessories are sourced in advance to production start. The quality of the trims is inspected and approved for production. Trims like laces, twill tapes, buttons, zippers, and drawcords are tested for color bleeding. Defective and damaged trims are separated and are not used in garments. 10% trims are inspected.
Types of trims and their suppliers
- Buttons:
- Anand Buttons
- Ryyty Apparels
- Mani Batra
- Hari Om Tradings
- Micro Deal
- Threads:
- Gutterman
- Hema Poly
- Tora Poly
- Sun thread
- Astra
- Zipper:
- Pratik Enterprises
- YKK India Ltd
- Hanger:
- Hook Operation
- JV Plastic Hangers
- Wooden Hangers
- Polybag:
- MaruDhara Packs Product
- Viltons
- Cartons:
- Prity Packaging
- Vahid Papers
- Shoulder Pad:
- Orion Apparel Trims Pvt. Ltd.
- Labels:
- Sharman Udyog Pvt. Ltd.
- KRF Ltd.
- Trinity
| Operation name | |
|---|---|
|
|
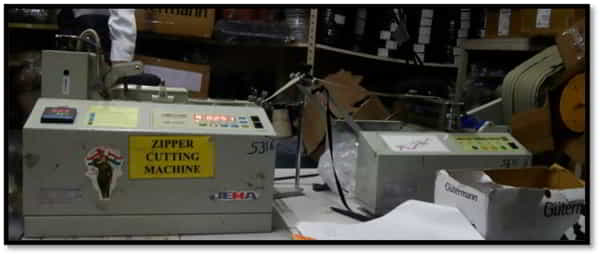
Cutting of zipper |
|
|
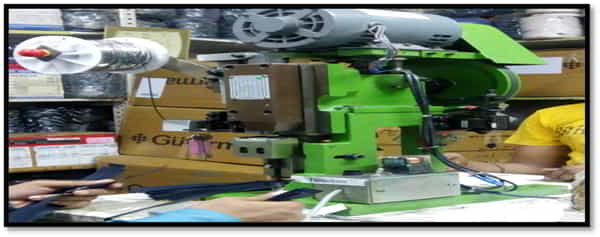
Locking of zipper |
|
|
Attaching runner |
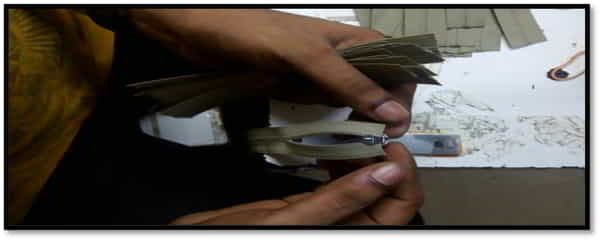
5.4 Zipper preparation
CAD Department
The CAD department receives tech-packs from the sampling department for pattern development. The patterns are developed as per the spec sheet with style details. Patterns developed manually are digitized using a digitizer. The pattern prepared on CAD is plotted on plotting paper by a Rich Piece Plotter. The plotted patterns are cut out manually and pasted on cardboard. These patterns are used for quality checking, referencing, sampling purposes, and cutting. After pattern development marker making is done on Optitex software importing pattern pieces as per the tech packs. The marker consists of detail such as size sets, length of the marker, width, efficiency with marker plan. Cut Order Plan is prepared as per the marker details.
The IE department calculates the marker efficiency. The final marker plan is prepared and sent to the cutting section with the sealed patterns. The CAD keeps the previously made patterns for future referencing in a stack.

Outcome
Plan of marker plays an important role in bulk production of garments, as it helps in reducing fabric wastage and calculating the requirement of fabric to be used for completing the whole order. The main role of the CAD department starts at time bulk production with rearrangement of pieces for marker printing.
The planning of the marker is done as per the fabric, with is shade variation, type of fabric.

Cutting Department
Fabrics Cutting
- Checks Fabric
- Solid fabric
- Stripes
- Prints (Directional, Non-Directional)
- Knitted
- Pocketing
- Fusing
- Canvas

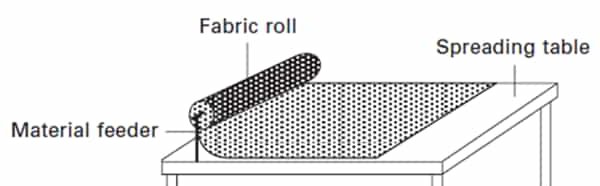
Fabric Spreading
Fabric spreading is a method where piles of fabric are spread a specific length and width wise according to the garment marker measurement. Fabric spreading is a very important task to maintain the proper shape of fabric before cutting garments
First, the fabric rolls are opened and spread on a cutting table layer by layer. This process is done. The length of the layer is decided based on the market size and marker length. Multiple numbers of fabric layers are spread on the table and all the fabric layers are cut together. Depending on the fabric thickness number of plies in a layer is decided. Normally the height of the lay is kept according to the cutting blade.
For the fabric spreading process, they use the manual method. The manual method is totally hand spreading method therefore this process is quite slow.
Before fabric spreading few perpetrations is essential. For the smooth and proper spreading process in garments below factors must be considered during fabric spreading-
Fabric Length and Width
During fabric spreading, length and width should equal marker length and width. This measurement must be uniform before fabric cutting. Otherwise, fabric wastage may be increased or defective garment components may be produced.
Fabric Tension
The tension in the fabric lay should be uniform. If the tension is higher the smaller size of the component may be produced than the actual size. On the other hand, if the fabric layer is loose then it may create problems during fabric cutting and larger size components may be produced than the actual size.
Fabric Splicing
Another important factor of fabric spreading is fabric splicing. Splicing should be accurate during fabric spreading. Excess splicing may increase faulty area and short splicing may produce the faulty component. The lay of the fabric should be maintained according to the fabric construction and splicing methods.
Static Electricity
Generally, man-made fibres are may increase the charge of electricity, which is the main reason for producing static electricity in the fabric spreading process. Static electricity should be removed by earthing or using special oil between two layers of fabric.
Fabric Ply Direction
The direction of the fabric ply should be corrected. Fabric ply direction depends on the type of fabric, Shape of the pattern and construction of the fabric. Therefore, ply direction must be checked before laying the ply on the cutting table. Otherwise, they may create problems during the sewing section in garments.
Ply Number
Ply number is another important factor for fabric spreading. Ply numbers should be counted during fabric spreading. The higher ply number may increase vibration between the cutting knife and fabric layer and a low number of ply may reduce the fabric spreading productivity.
Stripe and Check Matching
Stripe and check should be matched with every ply of fabric. Therefore stripe and check matching are done very carefully during the fabric spreading process in garments. Otherwise, that will be created problems during the sewing section in garments.
Fabric Faults removing
There are different types of fabric faults are found in the fabric inspection section. They are such as a hole, missing end, broken end, thick end, Reedy fabric, broken pattern, double pick, slub, snarl, thick and thin places, temple marks, etc. Before fabric spreading, those faults must be identified and also remove from the fabric.
Spreading
The manual spreading process for the production in Banswara. Manual spreading is used for all kinds of fabrics, including those with complex structures and intricate patterns. In large-scale production, manual cutting is often used for working with intricately patterned fabrics. The cost of technical equipment is low compared with automated spreading, but the productivity is poor.
During manual spreading two workers move the fabric plies over the spreading table, ensuring the correct placement of each ply. As they do so, they look for faults in the fabric and make the decision to leave them or cut them out. They also count the plies required and cut the fabric at the end of the spread. If the fabric has an intricate pattern, they ensure the pattern matches all the fabric plies in the spread.
Spreading speed and quality is dependent on the properties of a fabric and the skills and experience of the workers. There is no need for special equipment in manual spreading. All kinds of fabric may be laid but the process is both highly skilled and time-consuming.
At the beginning of the spreading process, an underlay paper ply is laid on the table to ensure easy transfer of the spread along with the table during the cutting process. The fabric spreading process is carried out by one worker at each side of the spreading table who moves the fabric ply to the beginning of a spread. The end of the fabric ply is placed precisely at the beginning of the spread and secured. Returning to the initial position (the place where the fabric roll is fixed) one worker aligns the laid down fabric ply with the edge of the table and the previously spread fabric plies with a permitted variant of +/-0.5 cm. The second worker smoothes the surface of the ply ensures an even tension in the fabric and prevents creases or folds from appearing during the spreading process. Thus the spreading process is repeated.
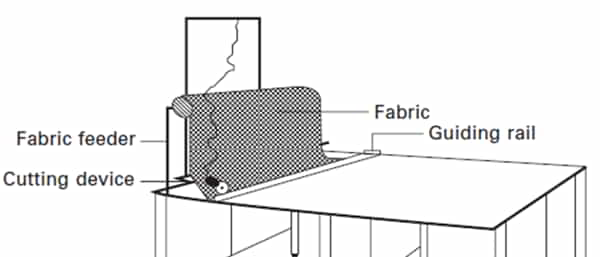
Characteristics
The spreading process is carried out on a spreading table with a smooth surface. The fabric feeder is fixed on a rod (at the end of the spreading table). A lay end cutter is used to cut the laid fabric plies; it is fixed on the spreading table adjacent to the fabric feeder. The fabric roll is fixed on a feeder axis before the spreading process is started. According to the spreading mode to be performed, the fabric roll is fixed with its face side up or down. The spreading process is performed in sequential steps.
- Marking the spread data
- Spreading the fabric plies
- Fixing a marker on top of the spread
Marking
The marker, which is printed on paper, is placed on the top ply of the lay. It is fixed in the required position and the following spread data are marked on both sides of the table: the beginning and end of a spread, splice marks (places in the spread where the fabric may be cut and laid double to deal with flaws without damaging the cut components) and size change places.
Disadvantage
The spreading speed and quality are largely dependent on the skills and experience of the workers performing the process. Spreading operators have a heavy load during the working day and fatigue may influence both spreading speed and quality. Two operators are involved.
| Serial No | Operation Name | Important details | Notes |
|---|---|---|---|
| 1 | Spreading | —– | Some part of the roll is stored so that in future if any cut piece of that roll is defected, it can be replaced. |
| 2 | Marker Laying | End to end should match. | —– |
| 3 | Cutting | —– | |
| 4 | Stickering | Order no should be remembered. Details in the sticker1. Size2. Layer No3. Serial No | Front and Back part-1 worker Small parts-4 workers Machine name: BLITZ Textile 2253 |
| 5 | Fusing | 4 types:1. Microdot-Used in Pocket bone, Pocket facing, Zipper fly.2. N.R-Used only on Buyer’s demand.3. Canvas-Used in Waistband.4. Knitted-For Knitted Fabric. | Total No of Machine available:2 3 m/c-small parts 2 m/c-belt loops No of operators at one m/c-3 Machine name: HASHIMI HP-450 CS |
| 5 | Panel checking | —- | Only front and back panels are checked. Small parts are not checked. Based on this a report is generated. |
| 6 | Bundling | 4 workers are required. | The defective panels are replaced from the fabric of the same roll |
| 7 | Dispatch | — | — |
Table 7.2- Cutting Details
Cutting Tools
Types of knife used:
- Straight Knife
- Band Knife
- CNC machine
Straight knife
- Blue Streak II
- The blade is changed in 1 or 1.5 days
- The blade has a cutting capacity of 7000.
- Average Cutting capacity/day -6000 pcs
- No of Tables present: 4
- Rate/pc-36 Paisa.
- Used for cutting big pieces.
- Price of machine:70-80 k
- Price of blade:53 Rs
| Class | 629 X |
|---|---|
| Volts | 220 v |
| Cycles | 50 |
| Speed | 2850 |
| Phase | 1 |
| Serial | 630386 |
| AMPS | 4.2 |
Table 7.3- Specifications
Band Knife
- EASTMAN ,EC,700 N
- The blade is changed in 7-9 days.
- Average cutting capacity/machine: 2500
- Rate: 19 paisa/pcs
- Price of machine: 1.5 lakhs
- Price of blade: 400 Rs
Computer Numerically Controlled (CNC) Fabric Cutting Machine
- This method provides the most accurate possible at high speed.
- Marker is fed in the system with the help of floppy disk, hard disk, CD, and DVD.
- Nylon bristles are present which support the fabric lays and are flexible enough to permit penetration and movement of Knife
- The bristles allow the passage of air through the table and create a vacuum.


IE Department
The IE department has to work with many other departments as this department gives the entire idea of the garment construction and the thread and trims consumption criteria, operators skill level categorization, and other related aspects hence they play a vital role in determining the cost of producing a single piece of the garment and they also calculate the cost of the factory for that particular style of garment.
The IE department does the time study to take out the SAM of each machine and manual operation. This is done in order to take out the standard allowed minutes needed to carry out each operation and hence the whole operation to make the garment.

Roles and responsibilities of I.E Department:
- WIP Report
- Incentives
- Gum sheet
- Barcode/stickers
- Time study/ capacity report
- Machine layout
- Style-wise efficiency report
- Production report input & output
- Skill matrix
- Wages-piece rate
- Line setup.
- Capacity – Work-Study
- Line Capacity
- Operator Capacity
- Operator training
- Skill Matrix of individual operators.
- Thread consumption.
- Manpower requirement details
- Man-machine Ratio
- WIP Report: The main role of the I.E. department is to maintain daily WIP reports. The manufacturing system which is used in Banswara is Progressive Bundle System which requires more WIP and continuous feeding to all operators.
- Gum Sheet: Gum sheets are maintained for each operator. Each operator is given a gum sheet in which the writer can fill in the number of bundles and pieces that he/she completed during that particular hour. This helps in bundle tracking, WIP and efficiency estimation of the particular operator.
- Barcode/Sticker: Barcode/sticker is prepared by the IED taking into consideration the SAM and the operation concerned. It consists of target production that the operator must achieve in order to get the incentive. It is then affixed on each machine which thus acts as a motivating factor for the operator to earn incentives by achieving better efficiency.
Production Department
The sewing department is the most crucial department of any apparel industry. This is the place where the cut components of a garment, are shaped and styled into a new form with proper seams and stitches as required.

Role of People in Sewing
- IED: This department works online balancing. They ensure optimum WIP to keep the production smooth. The heads inline setting according to style, number of operations, number of machines, number of operators. Line setting is done so that no operator should sit idle while working.
- FLOOR INCHARGE: This makes the operator understand the process well and make it easier for him to operate the machine and the operation. He also provides them with the working aids in the critical points, to make the operation easy. All the supervisors work under the floor in charge. He takes the charge of all the lines on the floor. He is constantly on a check all over the floor and manages the operator’s problems.
- QA: He handles all the checkers of the checking table of all lines. He ensures that no problem occurs related to quality in garments. He should always be present in PP meetings. He checks all the operations of the first piece that comes to the production line and takes the measurement of garments of all sizes.
- INLINE ROAMING QC: He keeps the quality manager updated about all the inline quality reports. He takes the measurement of the first piece of every order that comes from production. He checks for the critical operation in the line. He also keeps the information about jumping operations.
- SUPERVISOR: His work is manpower handling. He keeps an account of the operator skills and allots them for operation. He deals with absenteeism and decides the substitutes. He checks whether proper input is coming to their line or not and always works for better output. He clears alterations from floaters (jolly operators). His main work is to give a report of order closing.
- PRODUCTION WRITER: His main work is to make attendance of all operators. He makes an hourly report of operators and the number of pieces that they made during that hour. He cross-checks the attendance of operators every 15 days.
Sewing lines of Trouser
- Pearl
- Emerald
- Topaz
- Diamond
- Gold
- Ruby
- Turkish
- Opal
- Coral
Preparatory Sections of trouser
- Waistband
- Front pocket
- Back pocket
- Fly section
- Panels
1. Waistband
| Serial no | Operation Name | No. of machines required |
|---|---|---|
| 1 | Attach the strip to the belt | 1 |
| 2 | Attach gripper to belt | 1 |
2. Front Pocket
| Serial no | Operation Name | No of machines required |
|---|---|---|
| 1 | Attach 4 front facing+Taki | 1 |
| 2 | Close front pocket bagTurn front pocket bag | 1 |
| 3 | Turn the front pocket bag | 1 |
| 4 | Topstitch front pocket bag | 1 |
| 5 | Hem coin pocket+Attach | 1 |
| 6 | Tack front pocket | 1 |
| 7 | Tack extension with pocket | 1 |
| 8 | Remove embroidery fusing | 1 |
3. Back pocket
| Serial no | Operation Name | No of machines required |
|---|---|---|
| 1 | Attach facing to back pocket | 1 |
| 2 | Long bone press | 1 |
| 3 | Sew bone at back pocket | 1 |
4. Fly
| Serial no | Operation Name | No of machines required |
|---|---|---|
| 1 | Serge Small parts | 1 |
| 2 | Attach lining to the right fly | 1 |
| 3 | Bind at left fly | 1 |
| 4 | Attach fork line to fly | 1 |
5. Panels
| Serial no | Operation Name | No of machines required |
|---|---|---|
| 1 | Serge Small parts | 1 |
| 2 | Attach lining to the right fly | 1 |
| 3 | Bind at left fly | 1 |
| 4 | Attach fork line to fly | 1 |
Table 9.2- Preparatory Section
Front
| Serial no | Operation Name | No of machines required |
|---|---|---|
| 1 | Serge front and back panel | 2 |
| 2 | Sew back dart | 1 |
| 3 | Press back dart fusing | 1 |
Table 9.2 Preparatory Section
Back
| Serial no | Operation Name | No machines required |
|---|---|---|
| 1 | Fly, Pocket, panels | 1 |
| 2 | Attach front pocket of ply | 2 |
| 3 | Zipper | 1 |
| 4 | Pressing of pocket | 1 |
| 5 | Front checking | 1 |
Table 9.3 Front section
Assembly
| Serial no | Operation Name | No of machines required |
|---|---|---|
| 1 | Bone tacking | 2 |
| 2 | Bone Pressing | 1 |
| 3 | Back rise piping | 1 |
| 4 | Back pocket stitching Close and turn | 2 |
| 5 | Topstitch Tailor-made facing close | 1 |
| 6 | Attach label | 1 |
| 7 | Back checking | 1 |
Table 9.4 Back section
| Serial no | Operation Name | No of operators required |
|---|---|---|
| 1 | Matching and Sorting | 1 |
| 2 | Side seam Attach and inseam attach | 2 |
| 3 | Hanger loading | 1 |
| 4 | Sidelock inseam lock | 1 |
| 5 | Sew pocket bag with pocket | 1 |
| 6 | Front rise joining(Crotch joining) | 1 |
| 7 | Belt loop attach | 1 |
| 8 | Matching waistband | 2 |
| 9 | Waistband closing | 1 |
| 10 | Hook and eye | 1 |
| 11 | Wash care label | 1 |
| 12 | J stitch | 1 |
| 13 | Back rise | 1 |
| 14 | Pressing | 1 |
| 15 | Waistband checking | 1 |
| 16 | Cur Fel filling | 1 |
| 17 | Eyelet attach | 1 |
| 18 | Side pocket tacking | 1 |
| 19 | Bottom tacking | 1 |
| 20 | Bottom Overlock | 1 |
| 21 | Fit label | 1 |
| 22 | Bar tack | 2 |
| 23 | Waistband tacking | 1 |
| 24 | Thread Cutting | 1 |
| 25 | Thread removal by Suction | 1 |
| 26 | Final Checking | 1 |
Table 9.5 Assembly Section
| Checking no | Process Name | What checking is done |
|---|---|---|
| 1 | Cutting Audit | Checking of notches Checking of panels with actual pattern sizes It is done by line QC |
| 2 | Front panels Check | The front pocket opening is marked. Panel measurement is checked. |
| 3 | Back panels check | Mark back pocket position from the waist. Panel measurement is checked. |
| 4 | Assembly | Waistband Measurement is checked. All other important things are checked. |
| 5 | Final Checking | Final Checking. Done by the final checker. |
Table 9.6 Quality Checking in Lines

| Serial No | Machine Name | Used in operations | Feed System |
|---|---|---|---|
| 1 | 3 thread overlock | Panel serving, small parts serging | Drop feed |
| 2 | 5 thread overlock | Drop feed | |
| 3 | SNNF | J stitch, Waistband, Gripper, Waistband closing | Needle feed |
| 4 | Edge Cutter | Drop feed | |
| 5 | SNCM(Contains roller and folder) | Side Seam | Needle feed |
| 6 | DNCM(Tandem M/C) | Back rise | Needle feed |
| 7 | Buttonhole machine | To create hole | Drop feed |
| 8 | Button attach machine | Attaching buttons | Drop feed |
| 9 | Bar tack machine | Drop feed | |
| 10 | Tacking Machine | Tacking | Drop feed |
| 11 | Blind stitch machine | Bottom Hem | Drop feed |
| 12 | APW | Back pocket | Drop feed |
Table 9.7 Machines Details
Jacket
There are two lines in the jacket that are
- Jade
- Jasper
- Five sections in each line:-
- Sleeve-line 1
- Lining- line 2
- Body- line 3
- Assembly 1- line 4
- Assembly 2- line 5
- One floor in charge for each line
- One QA for each line
- One inline QC for each line
- 10 supervisors are there- one supervisor for each subline
- One production writer for each line
- One quality writer for both line
- One store writer for each line
- One dispatch writer for each line
- 3 helpers are there in each line
- Manpower in jacket line (for one line):-
- Sleeve- 14 (piece rate), 3 (fix rate)
- Lining- 28 (piece rate), 3 (fix rate)
- Body- 34 (piece rate), 3 (fix rate)
- Assembly 1- 30 (piece rate), 3 (fix rate)
- Assembly 2- 21 (piece rate), 2 (fix rate)
- Checkpoints in each section:-
- Sleeve- there is one checkpoint in the sleeve section and the points which should be checked are as follows:
- Sleeve out seam and inseam
- Sleeve vent
- Sleeve hem
- Sleeve lining
- Lining tacking
- Shade variation
- Balancing for both sleeves
- Lining- there is one checkpoint in the lining section and the points which should be checked are as follows:
- Collar shape and points
- Collar attaching with lining
- Collar band shape
- Collar felt attaching
- Facing attaching
- Inside velt pockets (both sides)
- Labeling- the main label, wash care label, size label, fit label
- Side panel attaching
- Centre back seam
- Shoulder seam
- Shade variation
- Sleeve- there is one checkpoint in the sleeve section and the points which should be checked are as follows:
- Five sections in each line:-
Machines in jacket Line
- SLEEVE LINE
- SNLS-9
- Fake Eyelet-1
- Pressing Table-3
- Button Attach-2
- Sorting Table-1
- Checking Table-1
- LINING
- SNLS-28
- SNCS-1
- DNCS-2
- APW-1
- Button Hole-1
- Pressing Table-4
- Over Lock-1
- Bartack-1
- Gixer Machine-1
- Zig-zag-1
- Sorting Table-2
- Buck Press-1
- Checking Table-1
- BODY
- SNLS-15
- SNCS-1
- Pressing Table-5
- Buck Press-1
- Armhole tape attach machine-1
- Micro zigzag machine-1
- APW-1
- Sorting Table-1
- Checking Table-2
- ASSEMBLY 1
- SNLS-14
- SNCS-2
- Shoulder Basting-1
- Shoulder Pad Pressing-1
- Pressing Table-7
- Zig-zag-1
- Edge Cutter-3
- Basting-1
- Buck press-1
- Sorting Table-1
- Checking Table-2
- ASSEMBLY 2
- SNLS-2
- Sleeve Attach-3
- Basting-4
- Sleeve Head Roll Attach-1
- Lining Attach-2
- Button Hole-2
- Pick Stitch-3
- Pressing Table-1
- Sorting table-1
- Thread Cutting Table-1
- Checking Table-2
- Chest Piece & Sleeve Head Roll
- SNLS-3
- Zig-Zag-2
- Basting-1
| MACHINE AND ITS NEEDLE TYPES | ||
|---|---|---|
| S.NO | MACHINE TYPE | NEEDLE TYPE |
| 1 | Single needle, Needle feed, Edge cutter | DBx1 |
| 2 | Bar tack, Zigzag, D/A-275, LBH-781 | DPx5 |
| 3 | Button Machine | DPx17 |
| 4 | Overlock | DCx1, DCx27 |
| 5 | Button Hole Machine | DOx558 |
| 6 | APW, Sleeve Machine, Basting Machine | DPx85, 2134 |
| 7 | Zigzag | 134EL |
| 8 | PinPoint | CPx12 |
| 9 | Imitation Button Hole | EBx750 |
| 10 | Head Roll Machine | MTx190 |
| 11 | Arm Hole Tape Attach Machine | 933 |
Table 9.8 Machine & Needle Type
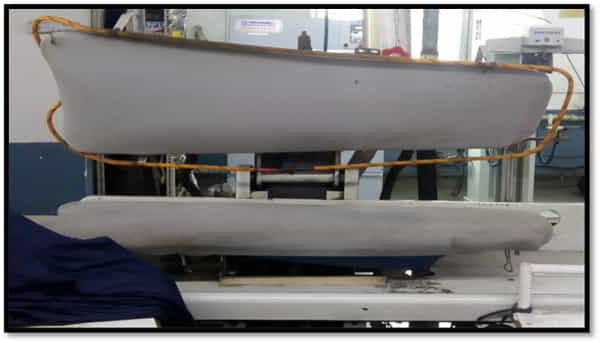
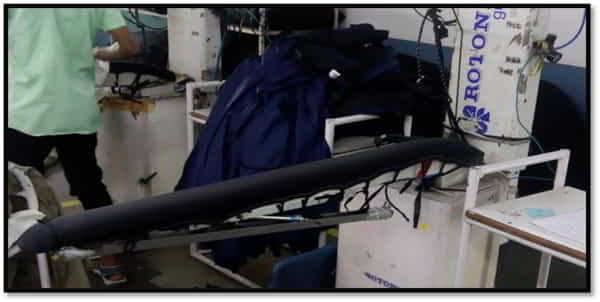
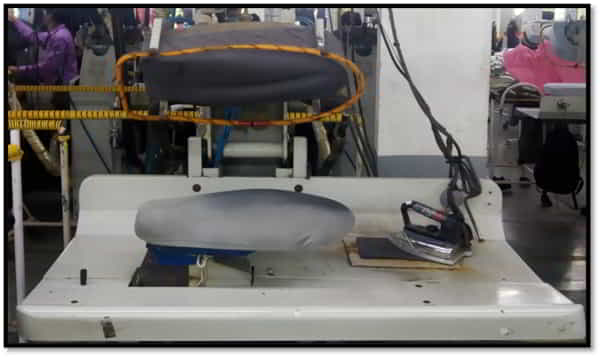
Pressing and Finishing Department
| Serial no | Operation name | Machine name,Brandname | Quantity |
|---|---|---|---|
| 1 | Side seam bust press | Steam iron, Tata train | 4 |
| 2 | Leg press | Buck Press, Tata train | 4 |
| 3 | Top press | Buck Press,Roton D | 16 |
Table 10.2 Pressing Details
Packing Department
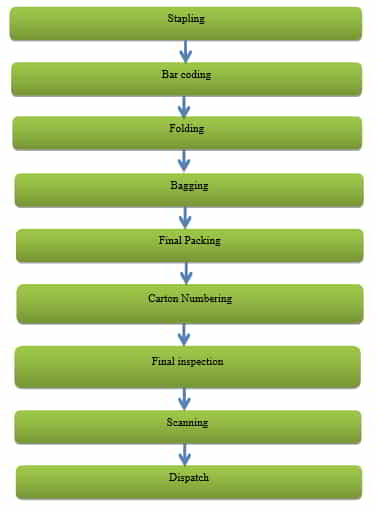
| Serial No | Process name | Details |
|---|---|---|
| 1 | Stapling | Size tag and fit tag are attached |
| 2 | Barcoding | All the tags are attached 3 persons are required. 1 for Barcode attaching and 2 for attaching other tags. |
| 3 | Folding | Folding Techniques: Single fold 2 fold Hanger |
| 4 | Final Pack | Ratio pack, Solid pack |
| 5 | Final inspection | Done by buyer. |
Table 11.2 Packing Details
Maintenance Department
Apart from having a quality system and the best practices, machine maintenance’ is also a very important area to get ‘quality’ products. Unacceptable quality of products often results from ill-maintained machines. Breakdown and preventive maintenance are primarily aimed toward reducing downtime and increasing life respectively proper machine maintenance are also necessary to avoid casualties on the floor. The function of preventive maintenance includes;
- Care of the fitting
- Adjusting status report
- Machine status report.
- Machine configuration charts
- Needle movement chart
- Needle log cards
Machine maintenance also carries the purchase and receiving activities. Its purchase has a track of every inventory including a needle present in the factory stock and procures new inventory whenever possible. The stock register is maintained with discipline.
Maintenance schedule
The maintenance schedule is carried out floor-wise. Every production floor is provided with a team of two mechanics, one assistant, and one helper, which takes care of the day-to-day maintenance, breakdown, and settings of the machine. Whenever there is a breakdown of the machine on the floor it is immediately shifted to the maintenance department and the same is replaced with a new machine from stock so that production is not disrupted. Oil checking is done on a weekly basis and changing of the oil and servicing of the machines is done every three months.
| Before Trial | ||||
|---|---|---|---|---|
| Serial No | Date | Total No of Defects | Total Check Pieces | Total DHU% |
| Day 1 | 13/06/19 | 1796 | 6130 | 29.30 |
| Day 2 | 15/06/19 | 1227 | 4143 | 29.62 |
| Day 3 | 16/06/19 | 1500 | 4561 | 32.89 |
| Day 4 | 17/06/19 | 1197 | 4440 | 26.96 |
| Day 5 | 18/06/19 | 1963 | 4910 | 39.98 |
| Day 6 | 19/06/19 | 1335 | 4335 | 30.80 |
| Day 7 | 20/06/19 | 1260 | 3572 | 35.27 |
| Day 8 | 22/6/19 | 1486 | 4708 | 31.56 |
| Day 9 | 23/6/19 | 1822 | 5745 | 31.71 |
| Day 10 | 24/6/19 | 2493 | 8935 | 27.90 |
| Day 11 | 25/6/19 | 1898 | 6496 | 29.22 |
| Day 12 | 26/6/19 | 1705 | 6398 | 26.65 |
| Day 13 | 27/6/19 | 2062 | 6245 | 33.02 |
| Day 14 | 29/6/19 | 2335 | 7298 | 32.00 |
| Day 15 | 30/6/19 | 1878 | 6808 | 27.59 |
| Total | 25957 | 84724 | ||
| Average | 1730.46 | 5648.26 | 30.63 |
Abstract
In today’s fast-changing world each customer is expecting high-quality garments with product variety. This project work deals with the productivity and quality enhancement in a garment manufacturing unit through a practical study conducted in the stitching department. The use of this project work will improve the efficiency of the production line for bottleneck operations, shows better utilization of available resources, reduce process variations & maintain consistency in the quality of the process output. The project result shows that the industry can achieve higher productivity and profitability with improved quality products by minimizing reworks activities. It also minimizes cost and improves internal throughput time. Initial reading before trial shows that DHU% is going out of control due to various reasons after necessary corrective action, the DHU% is decreased from 30.63% to 25.90%.
In every garment manufacturing, a number of rejected garments are found after product delivery. Some of the organizations considered these garments to be rejected because those garments have no more use by any means. But doing the Reworks in the garments industry for rejected pieces can hamper the smooth production rate and focus on poor quality products having an impact on the overall factory economy. There is no ready-made solution that can reduce rejection percentage overnight. Each order is unique. But this rework suggests how to handle such problems and bring down the rejection rate to a minimum with quality production. Minimization of reworks is a must in quality and productivity improvement. But this project works is suggesting how to handle such types of issues and bring down rejection rate to a minimum. Fabric defects are a very important issue that affects both buyer and supplier so the basic needs for productivity and quality improvement are to control defects rate during various activities of the sewing department. We have to control the productivity by supervising & strict operating conditions to be followed.
Method
In this project, we have collected 15-day DHU to analyze before and after the study. The standard method is to measure DHU of any process is to collect the data regarding the total pieces checked and the number of total defects is detected in the inspected garments. It is noted that it is a number of defects, not the defective garments. One defective garment may have more than one defect. At the time of inspection, a checker found different defects like a broken stitch, hole, raw edges, etc. Once you have a record of the following information of a lot you can measure DHU of that lot using a formula.
Table 1.1 Before Trial Data
| Before Trial | |||
|---|---|---|---|
| Serial No | Defects | Total No of Defects | Total DHU% |
| 1 | Bottom Hem (Broken stitch, overlock) | 6689 | 7.89% |
| 2 | Waistband (Down stitch, Broken stitch) | 2814 | 3.32 |
| 3 | Tacking (Missing) | 1699 | 2.00% |
| 4 | Trimming/Damage | 2126 | 2.50 |
| Total | 13,328 | 15.73% |


| Before Trial | |||
| Serial No | Defects | Total No of Defects | Total DHU% |
| 1 | Bottom Hem (Broken stitch, overlock) | 6689 | 7.89% |
| 2 | Waistband (Down stitch, Broken stitch) | 2814 | 3.32 |
| 3 | Tacking (Missing) | 1699 | 2.00% |
| 4 | Trimming/Damage | 2126 | 2.50 |
| Total | 13,328 | 15.73% |
Table 1.2

Root causes Analysis
A cause and effect diagram is a chart that identifies the potential causes for a particular quality problem.
This problem is related to the machine workers, measurement, supplier, material and many other aspects of the production process. This study has considered the causes. This study has considered the causes related to ‘4 M’ (man, machine, material, and method)
Root causes Analysis of waistband Down stitch


Solution
- The solution was found by analyzing the defects by 5 Why’s and the ways the process can fail.
- The solution was also found with the help of Poka-Yoke.
- It ensures that the right conditions exist before a process step is executed and thus preventing defects from occurring in the first place.
Implementation of 5 Why’s
BOTTOM
Q) Why are problems occurring at the Bottom (Broken Stitch, Open Bottom)?
- Due to improper machine setup.
Q) Why are the machines not properly set up?
- Due to untrained operators not having knowledge of setting machines.
Q) Why are the operators not having knowledge of setting machines?
- Due to No training provided
WAISTBAND
Q) Why are problems occurring at the waistband (Down stitch)?
- Due to uneven stitches near the fusing present near the waistband.
- Due to handling problems during down stitch.
- Due to improper setting of the pressure foot.
Q) Why are uneven stitches, handling problems, improper setting of pressure foot present?
- Due to unskilled operators/No training provided.
Solution Implementation
- The training was provided to the checkers about their roles and about how to carry out their checking.
- Training provided to the Operators about:
-
- Different types of defects, their causes, and remedies.
- Different factors affect stitching, defects, their causes, and remedies.
Checker’s Training Module
To control the quality of products of a factory, a checker should follow the following approaches:
- Have the proper approach toward operators.
-
- Approach operator with the defective garment.
- Ask the operator kindly to stop the work and pay attention.
- Explain the defect found and ask if she understands why the garment is defective.
- Make sure the operator understands why it is defective.
- Try to find out why the defect was created or why it was not detected at the workstation.
- Ask the operator to inspect the current bundle for more defective parts and then repair all parts that are out of tolerance including the one found by the inspector. This should be done immediately.
- Train operators to sew with good quality from the beginning.
- Know quality specifications and tolerances.
- Be sure to understand what constitutes good and poor quality.
- Be consistent in the decisions toward quality.
- Comment on both good and bad quality.
- Be sure to check each operator’s work daily. The number of defects found should govern the number of inspections performed. Vary inspection times and inspection sequence. Check into the middle of the bundle. Do not always look at only the top garments.
Job Role of In-line Checker
- Responsible for doing inline inspections on all operations/operators in a day.
- Responsible for generating all reports relating to inline inspection.
- Responsible for ensuring that during inline inspection standard quality specifications for each operation are being met at all the operation points.
- Responsible for communicating any quality discrepancy during inline inspection to the Quality Assurance Head and bringing the same to the immediate notice of the Line In-charge
Job Role of End-line Checker
- Responsible for doing the final inspection on all end-of-line sewn garments.
- Responsible for generating all reports relating to final inspection.
- Responsible for ensuring that standard quality specifications are met for all sewn garments.
- Responsible for communicating any quality discrepancy during final inspection to the Q.A. head and bringing the same to the immediate notice of the line in charge for taking corrective action.
Purpose of End-Line Inspection
The purpose of the End-Line Inspection is to check the quality of the final stitched garments for the following:
- Labeling
- Style
- Material
- Colour
- Accessories
- Defects
- Size measurement etc.
The inspection procedure can be started in the following way:
- The inspection table should have an even surface with the required slant surface and good lighting.
- At least 2 bins should be kept to keep good and defective garments separately.
- The fit sample, spec sheets, trim cards, etc should be ready for reference.
- Accessories like measuring tape, audit forms, pencils, etc should be carried.
- Lay garment on the table, front up.
- Flip garment over to the back.
- Turn the garment inside out and check the wrong side.
- Most Important of all the steps- Do not worsen the defect.
Job Role in End Line Inspection
| Step | Task | Responsibility |
|---|---|---|
| 1 | Lay the garment flat on the table. Check the finished garment for overall stitch quality and material defects. | Quality checker |
| 2 | Check each part of the garment in a sequence. Flatten the seams. | Quality checker |
| 3 | Turn the garment inside out and check for the stitching inside. Send for repairs if defects are found | Quality checker |
| 4 | Mark the defects found on the garment with clearly visible stickers. | Quality checker |
| 5 | Check the garment for measurements, which should be within the tolerance limit. | Quality checker |
| 6 | Give the bundle to the concerned section supervisor to carry out repairs. Enter the defects onto the repair list. Also, enter the bundle number and the time when it was collected. | Operator |
| 7 | Return the repairs to the operator | Supervisor |
| 8 | Return the repair bundles to the original checker. Fill out the time when the pieces were returned. | Operator |
| 9 | Recheck the bundle | Quality checker |
| 10 | Select or reject as in step 2 of 3 | Quality checker |
Table 1.3 Job Role in End Line Inspection
Pilot Run
- Pilot run comprises once an order is into production and no more than the first 30 pieces have come out of the line.
- There is a statistical quality inspection procedure applicable at this stage.
- This is done to identify the initial problems in the garment manufacture and solve them at the initial stage.
| Step | Task | Responsibility |
|---|---|---|
| 1 | All fabric, lining, trims and accessories must be checked for quantities to ensure production schedules are met standards against the approved sample. | Quality checker |
| 2 | Check each sewing operation for defects(random pieces) and suggest any attachments, folders that may benefit the operation. | Quality checker |
| 3 | Check for proper follow up of the recommended QA process and relevant forms such as:1. In-Process Inspection2. End Line Inspection3. Quality Audit | Quality checker |
| 4 | Check for the inspection points within the line and suggest additions/improvements wherever necessary. | Quality checker |
| 5 | Inquire for any specific problems | Quality checker, Supervisor |
| 6 | Advise and discuss the nature and magnitude of the problems and try and correct the problem along with the supervisor. | Quality checker, Supervisor |
| 7 | Record findings. | Quality checker |
Table 1.4 Pilot Run
Operator’s Training
- Pre-sewing activities
- Before sewing a garment, the sewing machine operator should
- Check that equipment is safe and set up in readiness for use
- Perform a machine, needle and spool check. Do samples run to check thread tension?
- Check that the materials to be used are free from faults
- Go through all the materials required for constructing the garment. Do fabric, thread and trims checking before sewing.
- Ensure the materials used meet the specification matching
- Before sewing a garment, the sewing machine operator should
- Go through the spec sheet and make sure the materials meet the specifications provided by the buyer
Factors affecting stitching
| Fault | Causes | Remedies |
|---|---|---|
| The sewing machine stops during sewing | The sewing machine has been run at a low speed for an extended period of time. To prevent overheating, motor power is automatically turned off. | Turn the power off and wait about 20 minutes. The safety device will reset, and the machine will be ready to operate. |
| The needle will not move. | The pressure foot is up. Bobbin Winder shaft in winding position. | Lower pressure foot. Move bobbin winder shaft back fully to left. |
| Upper thread breaks | The threading is not correct. Threading has a knot in it. The thread tension is too high. The needle is of the wrong size. | Correctly thread the machine. Remove knot. Correct thread Tension. Insert Correct needle. |
| Bobbin thread breaks | Bobbin has not been fully inserted in the bobbin case. Bobbin has been incorrectly threaded. Lint in the bobbin case. | Securely install bobbin in the bobbin case. Correctly thread bobbin case. Clean bobbin case and shuttle. |
| Needle breaking | Incorrect size of needle for thread and fabric. Needle bent. The pressure foot is incorrectly set. Crossing a thick seam using a too-small needle. | Place correct size of needle for thread and fabric. Change the needle Set the pressure foot properly. |
| Material not feeding correctly | Dirt under needle plate near feed dog. Incorrect pressure foot pressure. Bent pressure foot. | Clean the feed dog and the lower side of the needle plate. Check the pressure foot and its pressure. |
Table 1.5 Factors affecting stitching
Reporting Defects
| Defect | Causes | Remedies |
|---|---|---|
| Skipped stitches | The thread tension is too tight. The needle is bent or blunt. The needle is the wrong size. Needle and thread do not match. The thread take-up lever has not been threaded. Light pressure on pressure foot. Incorrect setting of needle | Correct thread tension. Replace the needle with the correct size. Use proper thread or needle. Check threading order. increase pressure on pressure foot. Reset Needle |
| Irregular stitch. | Incorrect size needle. Improper threading. Loose upper thread tension. Light pressure on pressure foot. Less pressure on the pressure foot | Choose the Correct size needle for thread and fabric. Rethread machine. Tighten upper thread tension. Increase pressure on pressure foot. |
| Fabric Puckering | Tensions are too high. Machine speed is too high for the material being sewn. Blunt needle | Check for the tension. Reduce the machine speed. Change the needle |
| Idle stitching | The Knotting Point of thread is formed without sewing product. | Adjust proper tension. Properly adjust the bobbin or looper. |
| Needle mark | Hole in the fabric due to needle due to resewing, basting etc. | Avoid seam ripping |
| Staggered Stitches | Less pressure on pressure foot. Take up spring weak, broken or missing. | Check the pressure on the pressure foot. Check for taking up spring. |
Table 1.6 Reporting Defects


| Before Trial | After Trial | |||||||
|---|---|---|---|---|---|---|---|---|
| Serial No | Date | Total No of Defects | Total Check Pieces | Total DHU% | Date | Total No of Defects | Total Check Pieces | Total DHU% |
| Day 1 | 13/06/19 | 1796 | 6130 | 29.30 | 10/7/19 | 1789 | 7791 | 22.96 |
| Day 2 | 15/06/19 | 1227 | 4143 | 29.62 | 11/7/19 | 2154 | 8534 | 25.24 |
| Day 3 | 16/06/19 | 1500 | 4561 | 32.89 | 13/7/19 | 2350 | 8573 | 27.41 |
| Day 4 | 17/06/19 | 1197 | 4440 | 26.96 | 14/7/19 | 2190 | 9436 | 23.21 |
| Day 5 | 18/06/19 | 1963 | 4910 | 39.98 | 15/7/19 | 1835 | 6711 | 27.34 |
| Day 6 | 19/06/19 | 1335 | 4335 | 30.80 | 16/7/19 | 2380 | 8117 | 29.32 |
| Day 7 | 20/06/19 | 1260 | 3572 | 35.27 | 17/7/19 | 2341 | 8113 | 28.85 |
| Day 8 | 22/6/19 | 1486 | 4708 | 31.56 | 18/7/19 | 1642 | 6972 | 23.55 |
| Day 9 | 23/6/19 | 1822 | 5745 | 31.71 | 20/7/19 | 2015 | 7872 | 25.60 |
| Day 10 | 24/6/19 | 2493 | 8935 | 27.90 | 21/7/19 | 1922 | 7057 | 27.24 |
| Day 11 | 25/6/19 | 1898 | 6496 | 29.22 | 22/7/19 | 2359 | 8106 | 29.10 |
| Day 12 | 26/6/19 | 1705 | 6398 | 26.65 | 23/7/19 | 1677 | 6735 | 24.90 |
| Day 13 | 27/6/19 | 2062 | 6245 | 33.02 | 24/7/19 | 1956 | 8296 | 23.58 |
| Day 14 | 29/6/19 | 2335 | 7298 | 32.00 | 25/7/19 | 2140 | 8057 | 26.56 |
| Day 15 | 30/6/19 | 1878 | 6808 | 27.59 | 27/7/19 | 2088 | 8658 | 24.12 |
| Total | 25957 | 84724 | 30838 | 119028 | ||||
| Average | 1730.46 | 5648.26 | 30.63 | 2055.86 | 7935.2 | 25.90 |
Table 1.7 Before and After Data Analysis


Improvement in Top 4 defects
| Before Trial | After Trial | ||||
|---|---|---|---|---|---|
| Serial No | Defects | Total No of Defects | Total DHU% | Total No of Defects | Total DHU% |
| 1 | Bottom Hem (Broken stitch, overlock) | 6689 | 7.89% | 8345 | 7.01% |
| 2 | Waistband (Down stitch, Broken stitch) | 2814 | 3.32 | 3190 | 2.68% |
| 3 | Tacking (Missing) | 1699 | 2.00% | 1876 | 1.57% |
| 4 | Trimming/Damage | 2126 | 2.50 | 2380 | 1.99% |
| Total | 13,328 | 15.73% | 15791 | 13.26% |
Table 1.8 Before And After Data Analysis

Cost-Benefit Analysis
- The project helped in reducing the manpower from 9 to 7.
- Wages of 1 Worker Rs 91728/Year
- And hence saving a total of Rs 183456/Year.
Conclusion
- Quality is improved by minimizing the DHU % from 30.63% to 25.9%.
- Elimination of defects like Bottom(Broken Stitch, Open Bottom), Waistband (Down stitch), Tacking(Missing) in sewing lines itself.
- Proper training is provided to quality checkers.
- Proper training is provided to operators.
- Proper checking of garments in the finishing department.